

Žingsnis po žingsnio GPS sekimo vadovas
Ar norite sekti savo transporto priemonės ar augintinio buvimo vietą, bet nežinote, kaip pradėti? Šis vadovas padės atlikti pagrindinius veiksmus ir parodys, kad tai visai nesunku. Taigi pradėkime.
Pasirinkite ir įsigykite tinkamą GPS sekiklį
Puslapyje įrenginiai galite peržiūrėti platformoje palaikomus įrenginius ir pasirinkti jums tinkantį geriausiai.
partnerių žemėlapio puslapyje galite matyti partnerius, iš kurių galite įsigyti sekiklį ir kas gali padėti naudotis programa.
Jei norite, galite įsigyti sekiklį bet kurioje kitoje jums patogioje vietoje.
Jei jau turite sekiklį, pereikite prie veiksmo 2.
Svarbu žinotiJei turite sekiklį, kurio nėra palaikomų įrenginių sąraše, galite parašyti mums ir galbūt galėsime prijungti šį įrenginį.
Susikurkite paskyrą ir prisijunkite prie programėlės
Pasirinkite tinkamą stebėjimo programą iš sprendimų puslapio. Galite atsisiųsti norimą programą arba naudoti jos žiniatinklio versiją.
Jei norite pradėti naudotis GPS-Trace platforma ar bet kuria iš jos taikomųjų programų, pirmiausia turite užsiregistruoti.
Norėdami tai padaryti, vadovaukitės nuoroda arba spustelėkite „Registruotis“ mygtuką viršutiniame dešiniajame kampe.
Taip pat galite užsiregistruoti vienos iš programų puslapyje. a> arba pačioje paraiškoje.
Užpildykite formą ir patvirtinkite savo el. pašto adresą, kad užbaigtumėte registraciją. Procesas užtruks ne ilgiau kaip 5 minutes.
Dabar galite prisijungti prie programos naudodami el. pašto adresą ir slaptažodį, kuriuos nurodėte registracijos metu.
Sukurkite objekta
Objektas nurodo, ką norite sekti, pavyzdžiui, transporto priemonę ar gyvūną.
Jį sukurti neužtruks ilgai.
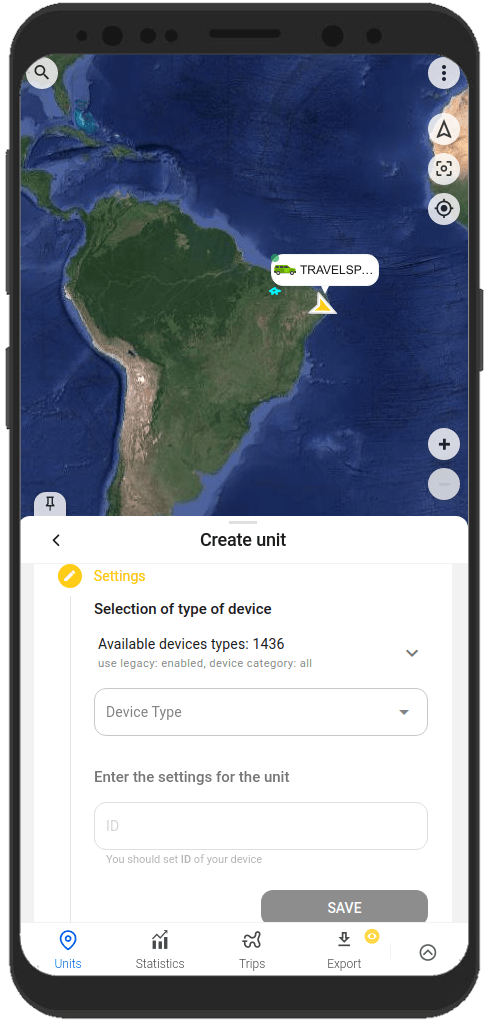
Jei norite sukurti objektą, spustelėkite objekto pasirinkimo lauką ir pasirinkite „Sukurti objektą“.
Bus atidaryta nuosekli objekto kūrimo forma:
- Iš sąrašo pasirinkite savo GPS įrenginio (sekiklio) modelį.
- Pateikite savo sekimo įrenginio informaciją, pvz., ID (IMEI) ir, jei reikia, slaptažodį.
- Spustelėkite mygtuką „Išsaugoti“.
Svarbu žinotiPagal numatytuosius nustatymus įrenginys bus sukurtas su tam tikromis savybėmis, pvz., pavadinimu. Vėliau galėsite juos pakeisti įrenginio nustatymuose.
Sukonfigūruokite sekiklį
Sukūrę įrenginį, turėtumėte jį prijungti prie sekimo įrenginio. Taigi sekimo priemonė galės siųsti duomenis į programą.
Norėdami tai padaryti, sukonfigūruokite stebėjimo priemonę atlikdami šiuos veiksmus:
- Duomenų perdavimo serverio ir prievado konfigūravimas
Kai įrenginys sukuriamas, programa parodo serverio adresą (IP arba DNS) ir prievadą, į kurį turėtumėte nukreipti sekiklį, kad sistema pradėtų veikti. gauti duomenis, juos apdoroti ir rodyti programoje. - Nustatykite laiko juostą 0 (UTC)
Daugumai stebėjimo priemonių, neatsižvelgiant į jūsų vietą, tiksliai nustatykite laiko juostą 0 (UTC). Programoje jūsų vietinė laiko juosta nustatoma pagal įrenginio (telefono ar kompiuterio), kuriame jį naudojate, duomenis. - Konfigūruoti APN
Konfigūruokite APN pagal SIM kortelės, kurią naudojate su stebėjimo įrenginiu, teikėją. Priklausomai nuo teikėjo, tai gali būti tik APN vardas arba APN vartotojo vardas ir slaptažodis.
Kai tik pakoreguosite reikiamus nustatymus ir jūsų stebėjimo priemonė pradės siųsti duomenis į sukonfigūruotą serverio adresą ir prievadą, iškart galėsite juos pamatyti programos žemėlapyje.

Svarbu žinotiDuomenų perdavimo sekiklius reikėtų naudoti su SIM kortele arba lustu.
Dažniausiai sekilklio konfigūravimo vadovas pateikiamas kartu su įrenginiu. Taip pat galite paprašyti savo GPS sekimo įrenginio pardavėjo arba gamintojo.
Sekimo priemonė paprastai sukonfigūruojama naudojant SMS komandas, nurodytas sekimo vadove. Komandos siunčiamos su sekikliu naudojamos SIM kortelės numeriu.
Kai kuriuose stebėjimo įrenginiuose gali būti speciali programa, skirta nustatyti naudojant kompiuterį.
Naudingos programos funkcijos
Mūsų programos padės ne tik stebėti įrenginio vietą žemėlapyje, bet ir pradžiuginti kitomis funkcijomis. Jie padės išnaudoti visas sekimo priemonės galimybes.
Štai keletas iš šių galimybių:
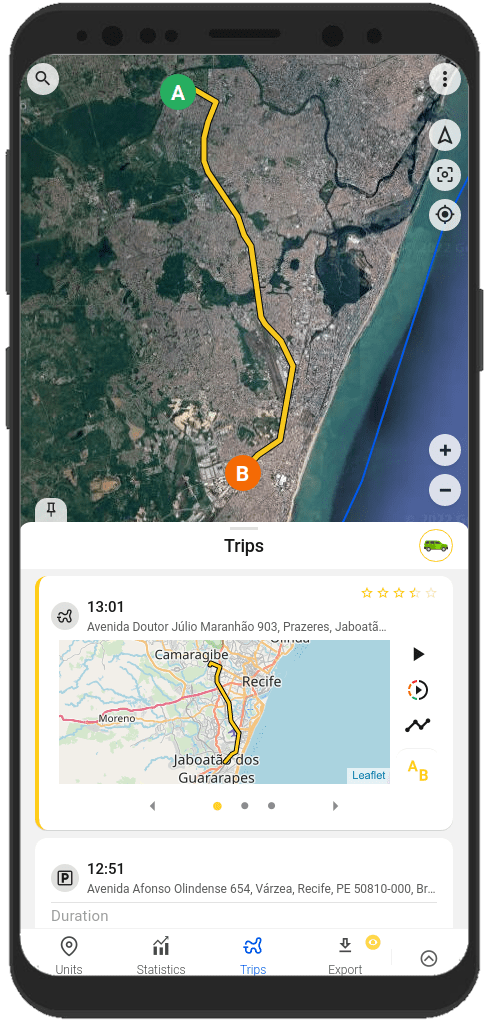
Jūsų objekto trasų kūrimas ir įvykių peržiūra
Ar norite sužinoti, kur tiksliai buvo jūsų objektas prieš kelias valandas ar dienas? Norėdami tai sužinoti, tereikia kelių paspaudimų.
Naudodami programą galite peržiūrėti išsamią judėjimo istoriją, sekti įvykius, nutikusius įrenginiui per pastarąjį laikotarpį.
Šią informaciją galite peržiūrėti skirtukuose „Kelionės“ ir „Laiko juosta“ bei įrenginio meniu skirtuke „Istorija“.
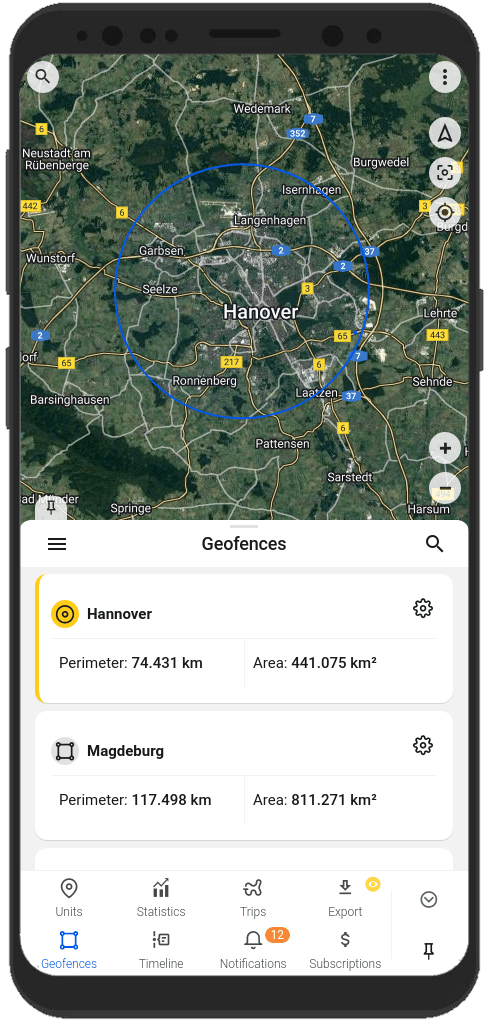
Geozonu kūrimas
Geozonos yra žemėlapyje pažymėta sritis.
Paprastai geozonos naudojamos pranešimams, kad įrenginys yra tam tikroje srityje arba iš jos išėjo, sukurti. Be to, geozonos padės greičiau naršyti žemėlapyje.
Galite kurti ir redaguoti geozonas programos skirtuke „Geozonos“.
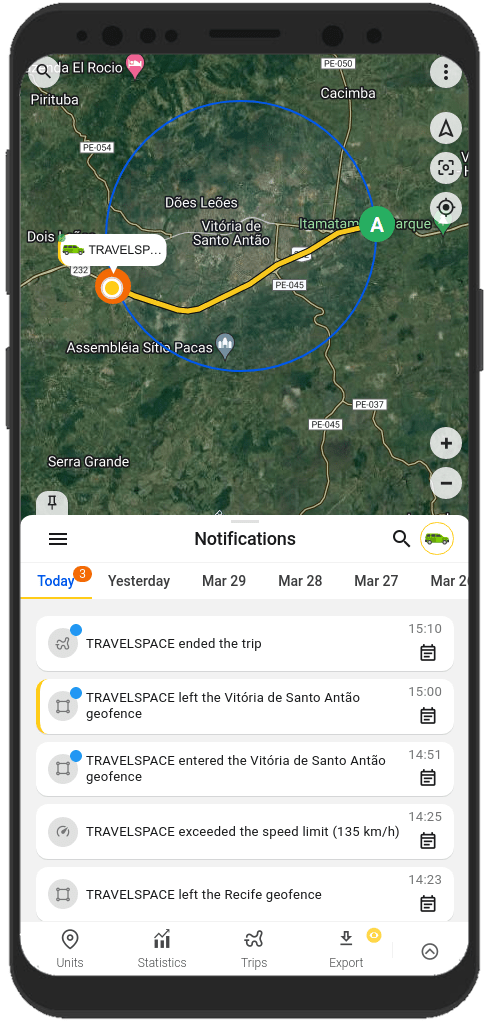
Gauti pranešimus apie objektą ir su objektu susijusius įvykius
Ar norite visada palaikyti ryšį su savo objektu?
Programa jums tai padės. Gaukite pranešimus jums tinkamiausiu būdu: pranešimus programoje, tiesioginius pranešimus, Telegramo ir el. pašto pranešimus, webhook pranešimus.
Visada žinosite:
- apie objekto patekimą į geozoną ir išėjimą iš jos;
- apie objekto greičio viršijimą;
- apie kelionės pradžią ir pabaigą;
Pranešimų tipus ir siuntimo būdus galite konfigūruoti skirtuke „Pranešimai“, įrenginio pranešimų nustatymuose arba vartotojo meniu.
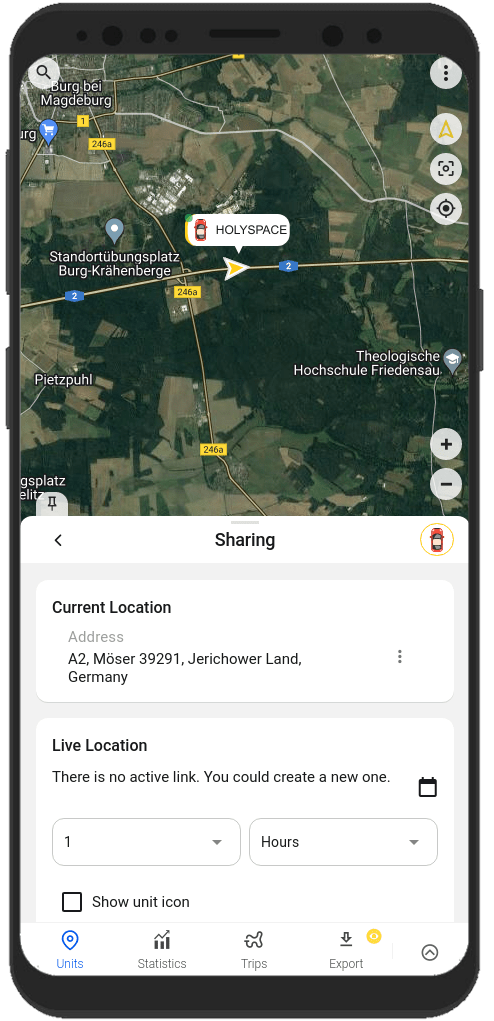
Dalytis savo objekto vieta su kitais žmonėmis
Ar norite pasidalinti transporto priemonės buvimo vieta su savo artimaisiais?
Nieko nėra lengviau.
Programoje galite sugeneruoti nuorodą, kuri nuves į jūsų įrenginio vietą. Tiesiog naudokite įrenginio meniu funkciją „Bendrinimas“.
Informacijos apie funkcijų sąranką ir darbą su jomis visada galite rasti mūsų dokumentacijoje, paspaudę nuorodą
FAQ
To track your location, you need:
1. Tracker integrated on our platform with a SIM card.
2. GPS monitoring application: Ruhavik, Petovik or Forguard.
More details about getting started.
List of integrated devices.
Please note that this list does not include about 500+ device types from the legacy category.
The full list of integrated devices can be seen in the device type line when creating a unit in the application.
Blog articles:
Discover the Power of GPS Tracking with GPS-Trace: Your Ultimate Guide
In order to see your tracker on the map in our application, you need to:
1. Create an account and log into it.
2. Create a unit.
3. Set up a tracker:
- direct your device to the server and port specified on the Hardware tab in the Unit settings;
- set time zone UTC 0;
- configure the APN (depending on the provider of the SIM cards, this may be just the APN or also the APN username and password).
As soon as the tracker starts sending data to our system, you will see your unit on the map.
More details about registration.
Most trackers are configured using SMS commands that are sent to the SIM card used in the tracker.
The list of SMS commands can be found in the instructions for the tracker. Some devices are configured using special programs - configurators - via a PC.
Instructions for the most popular trackers.
The tracking of one unit (car, motorcycle, bicycle, pet, etc.) is free.
With a paid subscription, up to 30 units can be created in one account.
Solution options:
1. Try to remember if your tracker is used in an account created with another email. To restore access to another account, if you remember this email, you can use the ""Forgot password?""
You can also write to us at support@gps-trace.com, specifying the ID/IMEI and type (model) of the tracker, and we will be able to check if the tracker is used in another account.
2. If the tracker is already registered in another account, and you cannot restore access to it, write to us at support@gps-trace.com with the ID / IMEI, type (model) of the tracker and attach a photo of the tracker, we will describe the next steps to solve the problem.
1. To select the most suitable tracker, you can contact one of our partners. You can find a partner on the partner map.
2. Our website has a list of devices integrated into our platform. To select a suitable tracker, you can use the appropriate hashtags: #vehicle #mobile #common #pet. And also see which trackers are the most popular on our platform in general or in your region.
List of integrated devices.
Please note that this list does not include about 500+ device types from the legacy category.
The full list of integrated devices can be seen in the device type line when creating a unit in the application.
Many trackers have different names but work on the same protocols. Accordingly, when connecting a device that is not in the list of integrated ones, you can try to select another type of device from the integrated ones. In this case, we recommend focusing on the protocol used by the tracker as well as SMS commands that your tracker understands and responds to.
If you are unable to select the type of device yourself, please contact us at support@gps-trace.com and write us your login/email, type, model, tracker manufacturer, and attach a photo of the tracker, instructions for it and a screenshot of the device configuration (SMS commands and device's answers), we will try to help you.
Blog articles:
Connecting Clones and Non-Integrated GPS Devices: Practical Tips
You can turn a mobile phone into a tracker using specialized applications.
We suggest using WiaTag or Traccar Client applications for this purpose.
Blog articles:
1. Using a Mobile Phone for Personal Monitoring with Ruhavik
2. How to use your phone as a tracker. Ruhavik & Traccar Client
3. How to use your phone as a tracker. Ruhavik & WiaTag
The tracker may not work for a variety of reasons.
Most frequent:
1) The problem is on the side of the mobile operator (SIM card).
2) Lack of balance on the SIM card.
3) Traffic limit.
4) The device is in a shielded room and therefore there is no communication.
5) Incorrect or lost tracker settings (for example, the tracker has gone into sleep mode or is configured to send messages infrequently).
6) The tracker does not have enough charge and it stores data in a black box until it is connected to a power source.
In this situation, we recommend:
1. Check the traffic limit and the balance of the SIM card used in the tracker. It happens that there is money on the SIM card, for example, but the entire traffic limit has already been used up.
2. Check your tracker settings and message frequency. Sometimes the tracker goes into sleep mode and, accordingly, does not send data about the tracker's location.
3. Check the correct installation of the tracker. Perhaps it is installed in a place (in a shielded box) that does not allow it to see the satellites well.
4. Make sure that the tracker is not located in a shielded area (covered parking, tunnel, building, etc.), which also makes it difficult for the tracker to receive coordinates from the satellite.
Blog articles:
Why GPS trackers may not work
The application has a Sharing option, which is designed to share the location of your unit with others using a special link.
Using the Sharing option, you can create such links for each unit for up to 1 year. It is also possible to create a link to access multiple units.
More details about Sharing.
Blog articles:
1. Use the Sharing option and stay in touch!
2. Updates in Ruhavik: Engine Hour Counters, Multiple Unit Sharing, and Track Tail
3. Petovik's Update: Introducing Sharing Option
To recover your password, you need to do the following:
1. When you enter the application, use the ""Forgot password?"" function, after which an email with a link to reset your password will be sent to the email associated with your account.
2. Follow the link in the email and create a new password.
3. Return to the login page and enter your username and new password.
To change your email address, you can do the following:
1. Go to the user settings by clicking on the three vertical dots in the upper right corner.
2. In the email line, click the pencil icon, a window for changing the address will open.
3. Enter your new email address and current password.
4. In the email that will be sent to your new email address, click on the link to confirm the change of email address.
There are two ways to change your password:
1) Function "Forgot password?"
1. On the account login page, click "Forgot password?", after which an email with a link to reset your password will be sent to the email associated with your account.
2. Follow the link in the email and create a new password.
3. Return to the login page and enter your username and new password.
2) Changing the password in the user settings:
1. Go to the user settings by clicking on the three vertical dots in the upper right corner.
2. In the password bar, click the pencil icon; a window for changing the password will open.
3. Enter the current password as well as the new password and repeat it.
More details about user settings.
In case you do not have access to your account and the email address to which the account is registered, write to us at support@gps-trace.com with the IMEI / ID, type (model) and manufacturer of your tracker, and we will describe the necessary steps to solve the problem.
In case your tracker was offline for some reason, it could accumulate GPS data in memory and, after reconnecting, start uploading this data into our system.
Thus, the time difference is formed:
1. time when the tracker received data from satellites;
2. the time when the data was sent to the system by the tracker.
Thus, so-called messages from the past come into the system.
In the Toolbox, such messages are grayed out.
More details about Toolbox.
The storage is designed to store data that comes from the tracker into our system.
After the entire amount of storage provided by your tariff plan is completely filled, new data from the tracker will overwrite the oldest ones. The application itself will continue to work as usual and will display the current location of the tracker.
The maximum storage period for data transmitted from the tracker in the application is 365 days.
In the statistics tab, the following information is available to users:
- summary mileage information;
- charts by parameters sent by the tracker;
- summary engine hours information (if the tracker sends the engine.ignition.status parameter and the user has a premium subscription);
- export events.
Also, the application collects data on the timeline (all information about the events of the unit: trips, parking, speeding, alarm messages, battery charge, towing, etc.) and on the history of trips (information about the track for a certain day or period of time).
More details about statistics.
Blog articles:
1. Mileage and Engine Hours Counters in Ruhavik
2. Exporting Data from Ruhavik: Detailed Guide
The application allows you to export data for the following sections:
- Timeline (all information about the events of the unit: trips, parking, speeding, alarm messages, battery charge, towing, etc.).
- Trip history (track information for a specific day or period of time).
- Toolbox (all tracker messages sent to our system).
- Export geofences.
For users with a premium subscription, the function of exporting events (in the ".xlsx" format) is available, in which you can choose:
- Required time interval: 1, 7 or 30 days.
- Events to include in statistics.
- Units for which statistics are needed.
- Separate statistics for each unit on a separate page or place them together with the Split into pages function.
- Add summary information for all selected units.
- Download the file to a computer / phone or send it by e-mail.
More details about statistics.
More details about exporting events.
Blog articles:
1. Exporting Data from Ruhavik: Detailed Guide
2. Ruhavik Updates: Nautical Measure, Data Export, and Unit Grouping on the Map
The application offers Simple, Customizable and Own notifications.
The simple ones are notifications:
- by geofences;
- by alarm messages from your device;
- on trips;
- for towing.
The customizable ones are notifications:
- about exceeding the specified speed by the unit;
- about the battery charge;
- the need to charge the device;
- about the absence of messages from the device.
Own notifications (available with a premium subscription).
This type of notification allows you to receive notifications related to the parameters you choose, which are contained in the messages sent by the tracker.
You can receive notifications about fuel, battery, door open/close, alarm activation, and much more.
More details about notification types.
Blog articles:
Notifications: Track your vehicle with ease
Notifications can be sent in the following ways:
- in the form of push notifications;
If you have a paid subscription, the following methods are also available:
- by email to the email associated with your account;
- to the Telegram messenger;
- in the form of webhooks to your server.
More details about setting up notifications in Telegram.
Our application is free to track 1 unit.
The free package also includes the use of 2 geofences and 10 MB of storage.
Benefits of paid subscriptions:
- More units (up to 30);
- More megabytes of data storage (100 MB);
- Google Maps;
- Additional ways to receive notifications that allow you to save them (email, Telegram and web hooks);
- Geofences-polygons;
- Commands Panel - extended custom GPRS commands;
- Export of summary reports in ".xslx"" format;
- Engine hours counters;
and much more.
You can subscribe through Google Play, App Store, or by paying with PayPal or Stripe. The cost of a subscription can be seen in the Subscriptions tab of the application or by clicking on the Subscribe button in the upper left corner on our website.
We really appreciate the feedback and ratings of our users because they help us develop and grow.
If you have the opportunity and a couple of minutes of time, we will be very grateful if you can rate our application:
- on Google Play;
- on App Store.
We communicate with our users via email.
- If you have any questions about working with Ruhavik, Petovik or Forguard applications, please contact us at support@gps-trace.com.
You can also post your question on our forum.
- If you want to become a partner and use our tools to build a monitoring business, write to us at business@gurtam.space.
More details our business solutions.