Panduan langkah demi langkah untuk pelacakan GPS
Anda ingin melacak lokasi kendaraan atau peliharaan tetapi tidak tahu bagaimana cara memulainya? Panduan ini akan menuntun Anda melalui cara-cara dasar dan menunjukkan kalau semua ini mudah dilakukan. Jadi, mari kita mulai.
Pilih dan beli GPS tracker yang sesuai kebutuhan
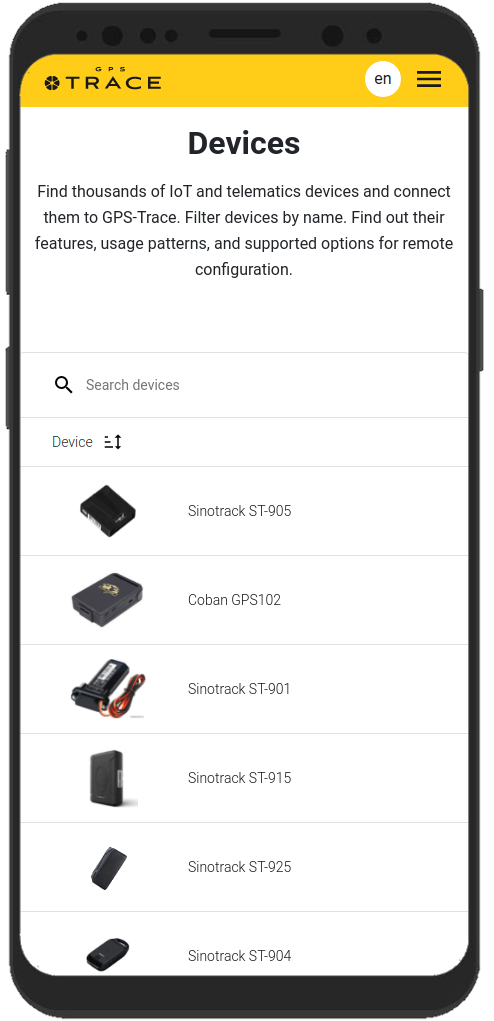
Pada halaman devices, Anda bisa melihat perangkat yang didukung oleh platform ini dan pilih salah satu yang sesuai.
Pada halaman pemetaan rekanan, Anda bisa melihat rekanan tempat Anda bisa membeli tracker dan siapa yang akan membantu Anda menggunakan aplikasi ini.
Jika Anda ingin, Anda bisa membeli tracker dari tempat lain yang menurut Anda lebih praktis untuk dilakukan.
Jika Anda sudah punya tracker, lompati ke langkah 2.
Penting untuk diketahuiJika Anda sudah punya tracker yang tidak ada di dalam daftar perangkat yang didukung, Anda bisa menanyakan kepada kami, dan mungkin kami bisa menghubungkan perangkat tersebut.
Buat akun dan login ke perangkat
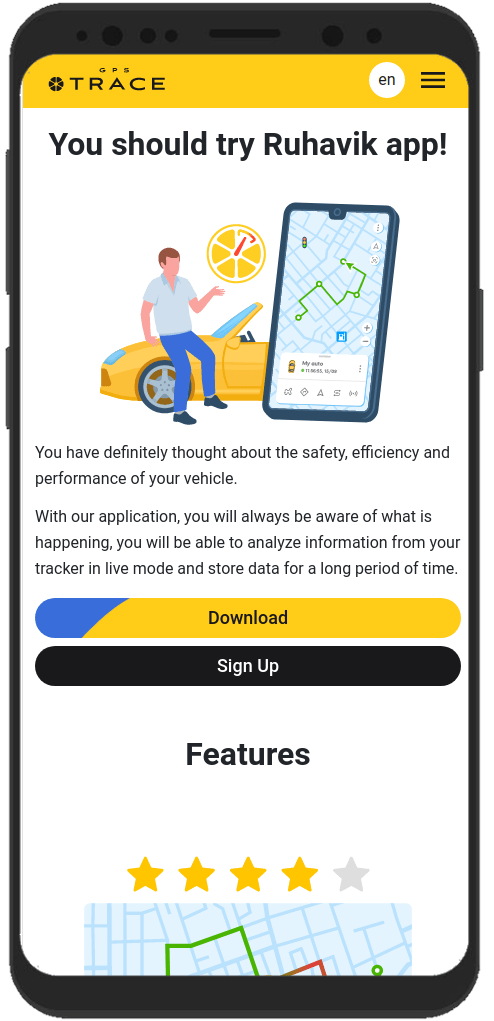
Pilih aplikasi pelacakan dari halaman Solusi. Anda dapat mengunduh aplikasi yang Anda inginkan atau menggunakan versi web-nya.
Untuk mulai menggunakan platform GPS-Trace atau aplikasi-aplikasinya yang lain, Anda perlu register terlebih dahulu.
Anda melakukannnya cukup dengan klik pranala atau klik tombol "Register" di pojok kanan atas.
Anda juga bisa register dari halaman aplikasi, atau dari aplikasi itu sendiri.
Isi formulirnya dan konfirmasi email Anda untuk menyelesaikan registrasi. Proses yang diperlukan tidak lebih dari 5 menit.
Sekarang Anda bisa login ke aplikasi menggunakan email dan kata sandi yang Anda berikan sewaktu registrasi.
Buat unit
Unit adalah apa yang ingin Anda lacak, contohnya, kendaraan atau peliharaan.
Hanya perlu waktu sebentar untuk membuat unit.
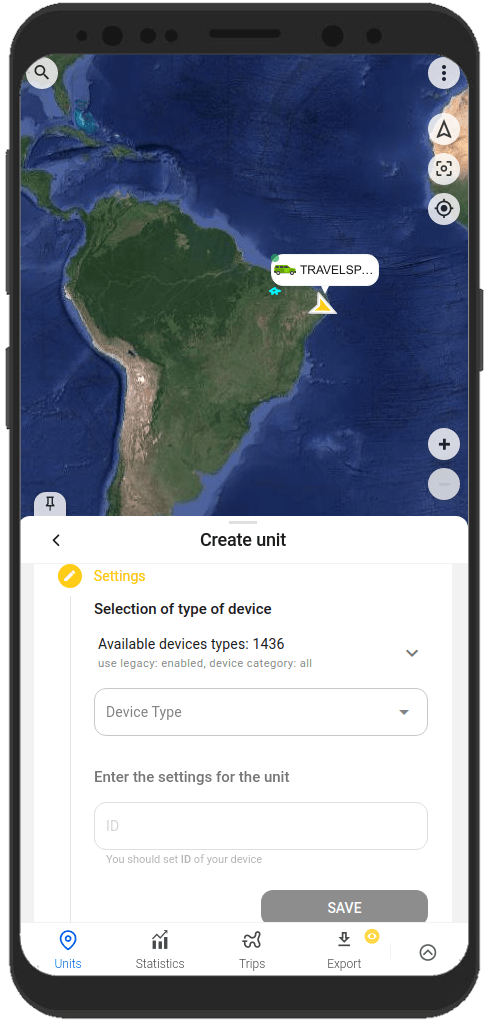
Untuk menciptakan unit, klik bidang pemilihan dan pilih "Buat unit".
Kemudian akan ditampilkan formulir langkah demi langkah untuk membuat unit:
- Pilih model perangkat GPS (Tracker) yang Anda miliki dari daftarnya.
- Isi rincian tracker Anda, seperti ID (IMEI) dan, jika diperlukan, kata sandi.
- Klik tombol "Simpan".
Penting untuk diketahuiUnitnya akan diciptakan dengan beberapa karakteristik, seperti nama, secara default. Anda dapat mengubahnya nanti dalam pengaturan unit.
Konfigurasi tracker
Setelah membuat unit, Anda perlu menghubungkannya dengan tracker. Agar tracker bisa mengirimkan data ke aplikasi.
Untuk melakukannya, konfigurasikan tracker dengan menjalankan hal-hal berikut:
- Konfigurasikan server dan port untuk transmisi data.
Saat unit diciptakan, aplikasi akan menampilkan alamat server (IP atau DNS) dan port yang akan mengarahkan tracker agar sistem dapat menerima datanya, memroses dan menampilkannya pada aplikasi. - Menentukan zona waktu UTC 0
Untuk sebagian besar tracker, terlepas dari lokasi Anda, atur ke zona waktu UTC 0. Pada apllikasi, zona waktu Anda ditentukan dari data perangkat (telepon atau komputer) yang Anda gunakan. - Konfigurasi APN
Konfigurasikan APN menurut penyedia kartu SIM yang Anda gunakan bersama tracker. Tergantung pada penyedia layanan, hal ini bisa hanya berupa APN atau juga nama pengguna APN dan kata sandi.
Segera setelah Anda selesai menyesuaikan semua pengaturan yang diperlukan dan tracker mulai mengirimkan data ke alamat server dan port, Anda akan langsung bisa melihat keberadaan unit di peta pada aplikasi.

Penting untuk diketahuiTransmisi data tracker harus digunakan bersama kartu SIM atau chip.
Seringkali, panduan pengaturan tracker disediakan bersama perangkat. Anda juga dapat meminta panduannya dari penjual atau produsen tracker GPS yang Anda beli.
Tracker biasanya diatur menggunakan perintah SMS yang ditentukan dalam panduan tracker. Perintah tersebut dikirm ke nomor kartu SIM yang digunakan bersama tracker.
Beberapa tracker dapat memiliki program khusus untuk pengaturan via komputer.
Fitur aplikasi yang dapat digunakan
Aplikasi kami akan membantu Anda bukan hanya dalam melacak lokasi unit di peta, tetapi juga melayani Anda dengan berbagai fungsi lainnya. Aplikasi kami akan membantu Anda dalam memanfaatkan kemampuan tracker.
Berikut beberapa hal yang dapat dinikmati dari aplikasi kami:
Menggambarkan jalur dan melihat peristiwa yang terjadi pada unit
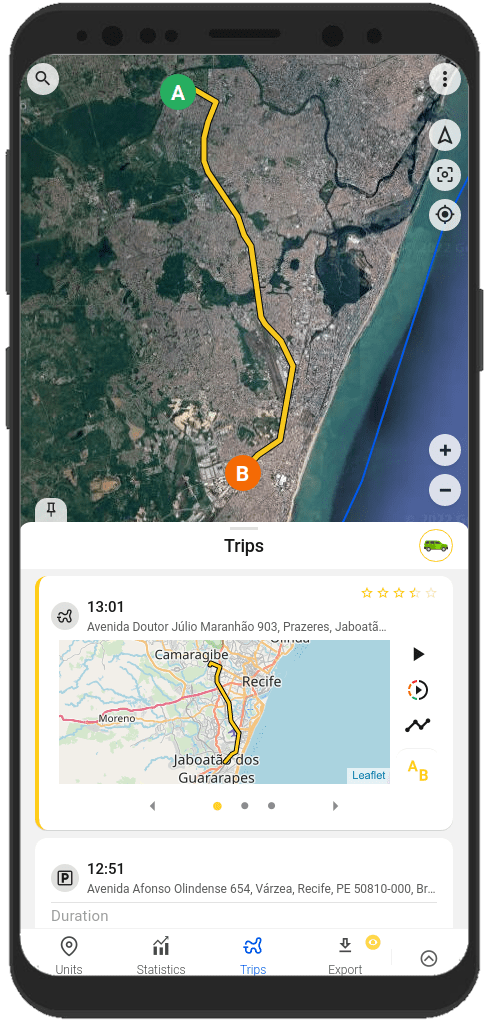
Anda ingin tahu di mana persisnya unit Anda beberapa jam atau beberapa hari yang lalu? Hanya perlu beberapa klik untuk melihatnya.
Dengan aplikasi, Anda bisa melihat rincian riwayat pergerakan, melacak peristiwa yang terjadi pada unit selama beberapa periode ke belakang.
Anda bisa melihat informasi tersebut pada tab "Perjalanan" dan "Linimasa" pada tab "Riwayat" di dalam menu unit.
Menciptakan geofence
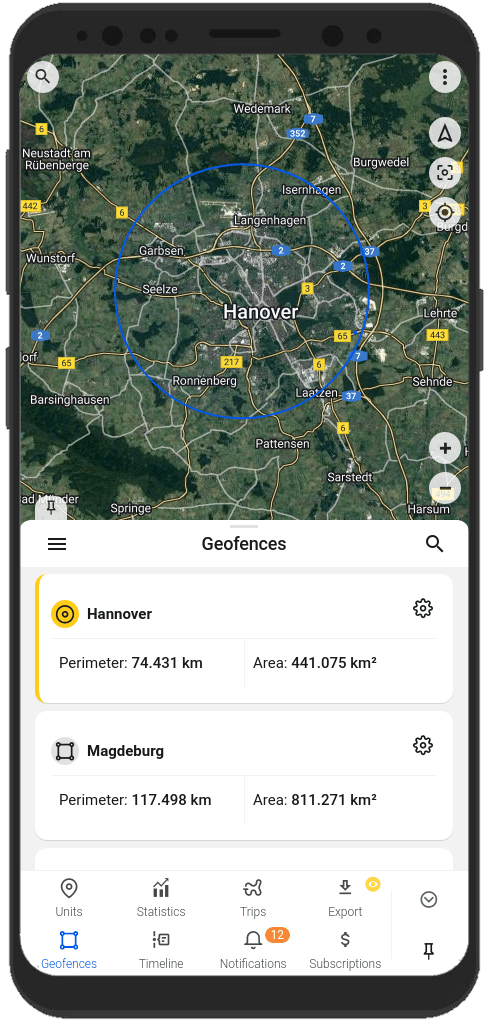
Geofence adalah area yang diberikan tanda di peta.
Sebagai aturan, geofence digunakan untuk memberikan notifikasi apakah suatu unit di dalam area atau sudah keluar dari area. Dan juga, geofence akan membantu melakukan navigasi pada peta dengan lebih cepat.
Anda bisa membuat dan mengedit geofence pada tab "Geofence" di dalam aplikasi.
Menerima notifikasi tentang kondisi unit dan peristiwa yang berkaitan dengan unit
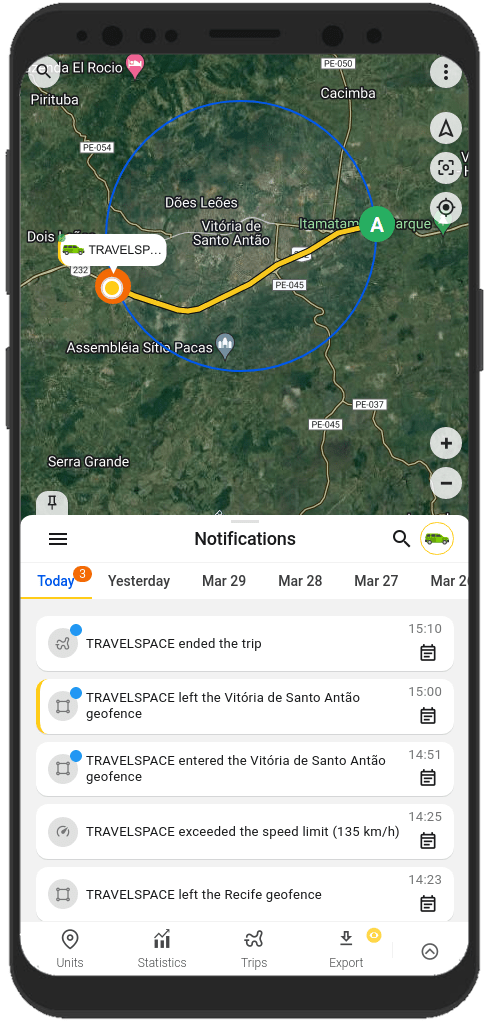
Apakah Anda ingin selalu terhubung dengan unit Anda?
Aplikasi kami akan membantu Anda dalam hal ini. Menerima notifikasi dengan cara yang sesuai Anda inginkan: notifikasi melalui aplikasi, notifikasi push, notifikasi Telegram dan email, notifikasi webhook.
Anda akan selalu mengetahui:
- tentang keluar masuk unit pada suatu geofence;
- tentang unit melebihi batas kecepatan yang ditentukan;
- tentang awal dan akhir dari suatu perjalanan;
Anda dapat atur tipe notifikasi serta metode pengirimannya pada tab "Notifikasi", di dalam pengaturan unit atau menu pengguna.
Membagikan lokasi unit bersama orang lain
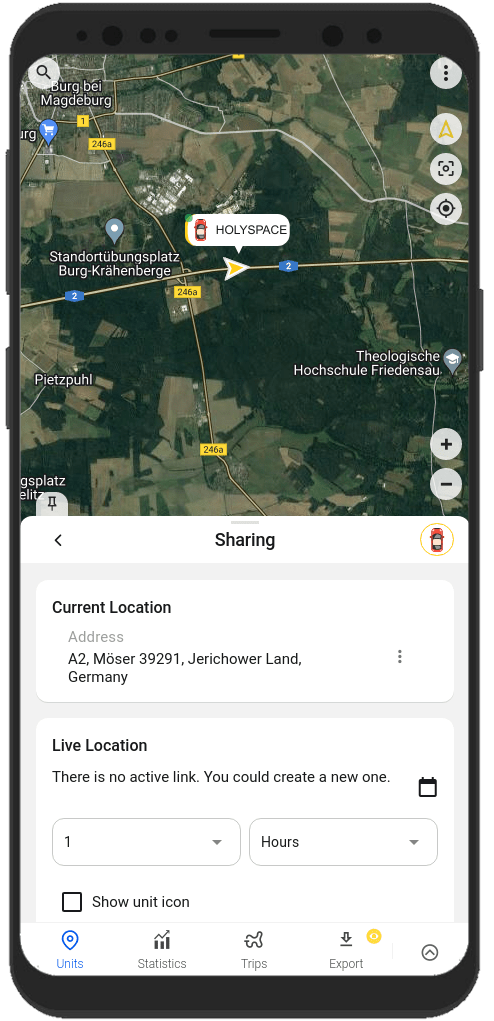
Anda ingin berbagi informasi lokasi kendaraan dengan keluarga Anda?
Sangat mudah.
Dengan aplikasi, Anda bisa membuat tautan yang akan menunjukkan lokasi unit Anda. Cukup dengan menggunakan fungsi "Berbagi" dari menu unit.
Anda akan selalu bisa menemukan informasi dengan pengaturan dan menggunakan fitur-fitur dalam dokumentasi kami di tautan
FAQ
To track your location, you need:
1. Tracker integrated on our platform with a SIM card.
2. GPS monitoring application: Ruhavik, Petovik or Forguard.
More details about getting started.
List of integrated devices.
Please note that this list does not include about 500+ device types from the legacy category.
The full list of integrated devices can be seen in the device type line when creating a unit in the application.
Blog articles:
Discover the Power of GPS Tracking with GPS-Trace: Your Ultimate Guide
In order to see your tracker on the map in our application, you need to:
1. Create an account and log into it.
2. Create a unit.
3. Set up a tracker:
- direct your device to the server and port specified on the Hardware tab in the Unit settings;
- set time zone UTC 0;
- configure the APN (depending on the provider of the SIM cards, this may be just the APN or also the APN username and password).
As soon as the tracker starts sending data to our system, you will see your unit on the map.
More details about registration.
Most trackers are configured using SMS commands that are sent to the SIM card used in the tracker.
The list of SMS commands can be found in the instructions for the tracker. Some devices are configured using special programs - configurators - via a PC.
Instructions for the most popular trackers.
The tracking of one unit (car, motorcycle, bicycle, pet, etc.) is free.
With a paid subscription, up to 30 units can be created in one account.
Solution options:
1. Try to remember if your tracker is used in an account created with another email. To restore access to another account, if you remember this email, you can use the "Forgot password?"
You can also write to us at support@gps-trace.com, specifying the ID/IMEI and type (model) of the tracker, and we will be able to check if the tracker is used in another account.
2. If the tracker is already registered in another account, and you cannot restore access to it, write to us at support@gps-trace.com with the ID / IMEI, type (model) of the tracker and attach a photo of the tracker, we will describe the next steps to solve the problem.
1. To select the most suitable tracker, you can contact one of our dealers. You can find a dealer on the partner map.
2. Our website has a list of devices integrated into our platform. To select a suitable tracker, you can use the appropriate hashtags: #vehicle #mobile #common #pet. And also see which trackers are the most popular on our platform in general or in your region.
List of integrated devices.
Please note that this list does not include about 500+ device types from the legacy category.
The full list of integrated devices can be seen in the device type line when creating a unit in the application.
Many trackers have different names but work on the same protocols. Accordingly, when connecting a device that is not in the list of integrated ones, you can try to select another type of device from the integrated ones. In this case, we recommend focusing on the protocol used by the tracker as well as SMS commands that your tracker understands and responds to.
If you are unable to select the type of device yourself, please contact us at support@gps-trace.com and write us your login/email, type, model, tracker manufacturer, and attach a photo of the tracker, instructions for it and a screenshot of the device configuration (SMS commands and device's answers), we will try to help you.
Blog articles:
Connecting Clones and Non-Integrated GPS Devices: Practical Tips
You can turn a mobile phone into a tracker using specialized applications.
We suggest using WiaTag or Traccar Client applications for this purpose.
Blog articles:
1. Using a Mobile Phone for Personal Monitoring with Ruhavik
2. How to use your phone as a tracker. Ruhavik & Traccar Client
3. How to use your phone as a tracker. Ruhavik & WiaTag
The tracker may not work for a variety of reasons.
Most frequent:
1) The problem is on the side of the mobile operator (SIM card).
2) Lack of balance on the SIM card.
3) Traffic limit.
4) The device is in a shielded room and therefore there is no communication.
5) Incorrect or lost tracker settings (for example, the tracker has gone into sleep mode or is configured to send messages infrequently).
6) The tracker does not have enough charge and it stores data in a black box until it is connected to a power source.
In this situation, we recommend:
1. Check the traffic limit and the balance of the SIM card used in the tracker. It happens that there is money on the SIM card, for example, but the entire traffic limit has already been used up.
2. Check your tracker settings and message frequency. Sometimes the tracker goes into sleep mode and, accordingly, does not send data about the tracker's location.
3. Check the correct installation of the tracker. Perhaps it is installed in a place (in a shielded box) that does not allow it to see the satellites well.
4. Make sure that the tracker is not located in a shielded area (covered parking, tunnel, building, etc.), which also makes it difficult for the tracker to receive coordinates from the satellite.
Blog articles:
Why GPS trackers may not work
The application has a Sharing option, which is designed to share the location of your unit with others using a special link.
Using the Sharing option, you can create such links for each unit for up to 1 year. It is also possible to create a link to access multiple units.
Sharing option is only available with a paid subscription.
More details about Sharing.
Blog articles:
1. Use the Sharing option and stay in touch!
2. Updates in Ruhavik: Engine Hour Counters, Multiple Unit Sharing, and Track Tail
3. Petovik's Update: Introducing Sharing Option
To recover your password, you need to do the following:
1. When you enter the application, use the ""Forgot password?"" function, after which an email with a link to reset your password will be sent to the email associated with your account.
2. Follow the link in the email and create a new password.
3. Return to the login page and enter your username and new password.
To change your email address, you can do the following:
1. Go to the user settings by clicking on the three vertical dots in the upper right corner.
2. In the email line, click the pencil icon, a window for changing the address will open.
3. Enter your new email address and current password.
4. In the email that will be sent to your new email address, click on the link to confirm the change of email address.
There are two ways to change your password:
1) Function "Forgot password?"
1. On the account login page, click "Forgot password?", after which an email with a link to reset your password will be sent to the email associated with your account.
2. Follow the link in the email and create a new password.
3. Return to the login page and enter your username and new password.
2) Changing the password in the user settings:
1. Go to the user settings by clicking on the three vertical dots in the upper right corner.
2. In the password bar, click the pencil icon; a window for changing the password will open.
3. Enter the current password as well as the new password and repeat it.
More details about user settings.
In case you do not have access to your account and the email address to which the account is registered, write to us at support@gps-trace.com with the IMEI / ID, type (model) and manufacturer of your tracker, and we will describe the necessary steps to solve the problem.
In case your tracker was offline for some reason, it could accumulate GPS data in memory and, after reconnecting, start uploading this data into our system.
Thus, the time difference is formed:
1. time when the tracker received data from satellites;
2. the time when the data was sent to the system by the tracker.
Thus, so-called messages from the past come into the system.
In the Toolbox, such messages are grayed out. Toolbox is only available with a paid subscription.
More details about Toolbox.
The storage is designed to store data that comes from the tracker into our system.
After the entire amount of storage provided by your tariff plan is completely filled, new data from the tracker will overwrite the oldest ones. The application itself will continue to work as usual and will display the current location of the tracker.
The maximum storage period for data transmitted from the tracker in the application is 365 days.
In the Statistics tab, the following information is available to users:
- summary mileage information;
- charts by parameters sent by the tracker;
- summary engine hours information (if the tracker sends the engine.ignition.status parameter and the user has a premium subscription);
- export events.
Statistics tab is only available with a paid subscription.
More details about statistics.
Also, the application collects data on the timeline (all information about the events of the unit: trips, parking, speeding, alarm messages, battery charge, towing, etc.) and on the history of trips (information about the track for a certain day or period of time).
Timeline tab is only available with a paid subscription.
Blog articles:
1. Mileage and Engine Hours Counters in Ruhavik
2. Exporting Data from Ruhavik: Detailed Guide
The application allows you to export data for the following sections:
- Timeline (all information about the events of the unit: trips, parking, speeding, alarm messages, battery charge, towing, etc.).
- Trip history (track information for a specific day or period of time).
- Toolbox (all tracker messages sent to our system).
- Export geofences.
For users with a premium subscription, the function of exporting events (in the ".xlsx" format) is available, in which you can choose:
- Required time interval: 1, 7 or 30 days.
- Events to include in statistics.
- Units for which statistics are needed.
- Separate statistics for each unit on a separate page or place them together with the Split into pages function.
- Add summary information for all selected units.
- Download the file to a computer / phone or send it by e-mail.
More details about statistics.
More details about exporting events.
Blog articles:
1. Exporting Data from Ruhavik: Detailed Guide
2. Ruhavik Updates: Nautical Measure, Data Export, and Unit Grouping on the Map
The application offers Simple, Customizable and Parameter notifications.
The simple ones are notifications:
- by geofences;
- by alarm messages from your device;
- on trips;
- for towing.
The customizable ones are notifications:
- about exceeding the specified speed by the unit;
- about the battery charge;
- the need to charge the device;
- about the absence of messages from the device.
The customizable notifications are available with a paid subscription.
Parameter notifications (available with a paid subscription).
This type of notification allows you to receive notifications related to the parameters you choose, which are contained in the messages sent by the tracker.
You can receive notifications about fuel, battery, door open/close, alarm activation, and much more.
More details about notification types.
Blog articles:
Notifications: Track your vehicle with ease
Notifications can be sent in the following ways:
- in the form of push notifications;
If you have a paid subscription, the following methods are also available:
- by email to the email associated with your account;
- to the Telegram messenger;
- in the form of webhooks to your server.
More details about setting up notifications in Telegram.
Our application is free to track 1 unit.
The free package also includes the use of 1 geofence and 1 MB of storage.
Benefits of paid subscriptions:
- More units (up to 30);
- More megabytes of data storage (up to 100 MB);
- Google Maps (available in Premium Basic and above);
- Additional ways to receive notifications that allow you to save them - email, Telegram and web hooks. (available in Premium Basic and above);
- Geofences-polygons (available in Premium Basic and above);
- Commands Panel - extended custom GPRS commands (available in Premium Basic and above);
- Tools - configure the operation of GPS devices or debug them using Toolbox and Setbox.
- Location Sharing - share the location of your vehicles with other people using a special link.
- Timeline - track all events of the unit for the selected day in chronological order.
- Statistics - view statistics for your properties and analyze them using graphs. Export summary reports in ".xlsx" format available starting with Premium Basic plan and higher.
- Maintenance - monitor the condition of your vehicle and control its technical maintenance. Engine Hours Counters available starting with Premium Basic plan and higher.
You can subscribe through Google Play, App Store, or by paying with PayPal or Stripe. The cost of a subscription can be seen in the Subscriptions tab of the application or by clicking on the Subscribe button in the upper left corner on our website.
We really appreciate the feedback and ratings of our users because they help us develop and grow.
If you have the opportunity and a couple of minutes of time, we will be very grateful if you can rate our application:
- on Google Play;
- on App Store.
We communicate with our users via email.
- If you have any questions about working with Ruhavik, Petovik or Forguard applications, please contact us at support@gps-trace.com.
You can also post your question on our forum.
- If you want to become a partner and use our tools to build a monitoring business, write to us at business@gurtam.space.
More details our business solutions.


