

Guide étape par étape pour le suivi GPS
Vous souhaitez localiser votre véhicule ou votre animal de compagnie, mais vous ne savez pas par où commencer? Ce guide vous guidera à travers les étapes de base et vous montrera que ce n'est pas du tout difficile. Commençons donc par le commencement.
Choisir et acheter le bon traceur GPS
Sur la page des appareils, vous pouvez voir les appareils pris en charge sur la plateforme et choisir celui qui vous convient le mieux.
Sur la page de la carte des partenaires, vous pouvez voir les partenaires auprès desquels vous pouvez acheter le tracker et qui peuvent vous aider à utiliser l'application.
Si vous le souhaitez, vous pouvez acheter le tracker dans n'importe quel autre endroit pratique pour vous.
Si vous avez déjà un tracker, passez à l'étape 2.
Ce qu'il faut savoirSi vous avez un traceur qui ne figure pas sur la liste des appareils pris en charge, vous pouvez nous écrire et nous pourrons peut-être connecter cet appareil.
Créer un compte et se connecter à l'application
Sélectionnez l'application de suivi appropriée depuis la page des solutions. Vous pouvez télécharger l'application souhaitée ou utiliser sa version web.
Pour commencer à utiliser la plateforme GPS-Trace ou l'une de ses applications, vous devez d'abord vous inscrire.
Pour ce faire, suivez le lien ou cliquez sur le bouton "S'inscrire" dans le coin supérieur droit.
Vous pouvez également vous inscrire sur la page de l'une des applications, ou dans l'application elle-même.
Remplissez le formulaire et confirmez votre adresse e-mail pour terminer l'inscription. Le processus prendra moins de 5 minutes.
Maintenant, vous pouvez vous connecter à l'application en utilisant l'e-mail et le mot de passe que vous avez spécifiés lors de l'inscription.
Créer une unité
L'unité représente ce que vous souhaitez suivre, par exemple, un véhicule ou un animal de compagnie.
Cela ne prendra pas longtemps à créer.
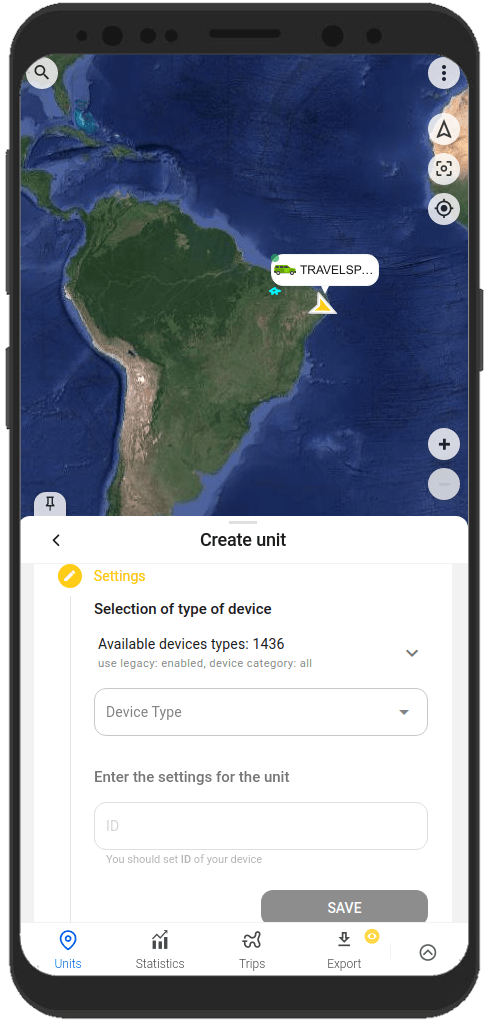
Pour créer une unité, cliquez sur le champ de sélection d'unité et sélectionnez "Créer une unité".
Un formulaire étape par étape pour créer une unité s'ouvrira:
- Sélectionnez le modèle de votre dispositif GPS (traceur) dans la liste.
- Indiquez les détails de votre traceur, tels que son identifiant (IMEI) et, si nécessaire, un mot de passe.
- Cliquez sur le bouton "Enregistrer".
Ce qu'il faut savoirL'unité sera créée avec certaines caractéristiques, telles qu'un nom, par défaut. Vous pouvez les modifier ultérieurement dans les paramètres de l'unité.
Configurer le traceur
Après avoir créé l'unité, vous devez la connecter à votre traceur. Ainsi, le traceur pourra envoyer des données à l'application.
Pour ce faire, configurez le traceur en effectuant les actions suivantes:
- Configurer le serveur et le port pour la transmission de données
Lorsque l'unité est créée, l'application affiche l'adresse du serveur (IP ou DNS) et le port vers lequel vous devez diriger votre traceur pour que le système commence à recevoir des données, les traiter et les afficher dans l'application. - Définir le fuseau horaire UTC 0
Pour la plupart des traceurs, quelle que soit votre position, définissez précisément le fuseau horaire UTC 0. Dans l'application, votre fuseau horaire local est déterminé à partir des données de l'appareil (téléphone ou ordinateur) sur lequel vous l'utilisez. - Configurer l'APN
Configurez l'APN en fonction du fournisseur de la carte SIM que vous utilisez avec le traceur. Selon le fournisseur, il peut s'agir uniquement de l'APN ou également du nom d'utilisateur et du mot de passe de l'APN.
Dès que vous avez ajusté les paramètres nécessaires et que votre traceur commence à envoyer des données à l'adresse et au port de serveur configurés, vous pouvez immédiatement le voir sur la carte de l'application.

Ce qu'il faut savoirLes traceurs de transmission de données doivent être utilisés avec une carte SIM ou une puce.
Le plus souvent, le guide de configuration du traceur est fourni avec le dispositif. Vous pouvez également le demander au vendeur ou au fabricant de votre traceur GPS.
Le traceur est généralement configuré à l'aide de commandes SMS spécifiées dans le guide du traceur. Les commandes sont envoyées au numéro de la carte SIM utilisée avec le traceur.
Certains traceurs peuvent avoir un programme spécial pour la configuration via un ordinateur.
Fonctionnalités utiles de l'application
Nos applications vous aideront non seulement à suivre l'emplacement d'une unité sur la carte, mais également à vous plaire avec d'autres fonctions. Ils vous aideront à tirer le meilleur parti de votre tracker.
Voici quelques-unes de ces possibilités:
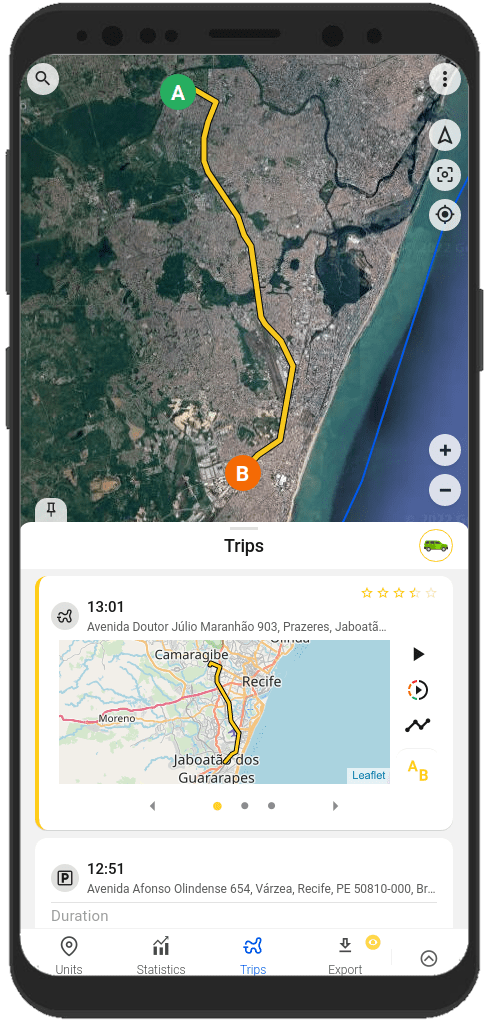
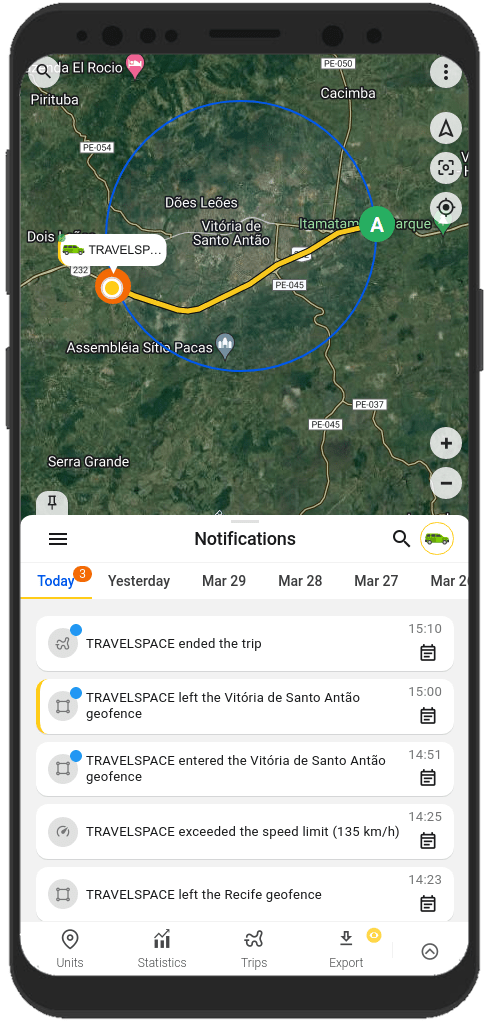
Construire les pistes et visualiser les événements de votre unité
Voulez-vous savoir exactement où se trouvait votre unité il y a quelques heures ou quelques jours ? Cela ne prend que quelques clics pour le savoir.
À l'aide de l'application, vous pouvez afficher un historique détaillé des mouvements, suivre les événements survenus à l'unité au cours de la période écoulée.
Vous pouvez afficher ces informations sur les onglets "Voyages" et "Chronologie" et sur l'onglet "Historique" du menu de l'unité.
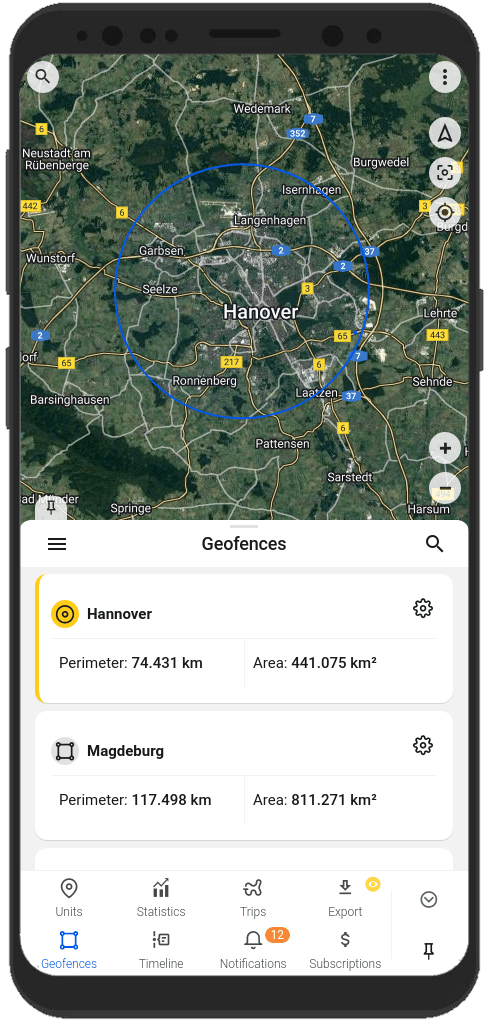
Création de barrières géographiques
Une géo-clôture est une zone marquée sur la carte.
En règle générale, les géo-clôtures sont utilisées pour créer des notifications indiquant qu'une unité se trouve à l'intérieur d'une certaine zone ou en est sortie. Les géo-clôtures vous aideront également à naviguer plus rapidement sur la carte.
Vous pouvez créer et modifier des géo-clôtures sur l'onglet "Géo-clôtures" de l'application.
Recevoir des notifications sur l'état de l'unité et les événements liés à l'unité
Voulez-vous être toujours en contact avec votre unité?
L'application vous y aidera. Recevez des notifications de la manière qui vous convient le mieux: notifications dans l'application, notifications push, notifications par télégramme et par e-mail, notifications par webhook.
Vous saurez toujours:
- à propos de l'unité entrant dans la clôture géographique et en sortant;
- sur l'unité dépassant la vitesse spécifiée;
- sur le début et la fin du voyage;
Vous pouvez configurer les types de notification et les méthodes d'envoi dans l'onglet "Notifications", dans les paramètres de notification de l'unité ou dans le menu utilisateur.
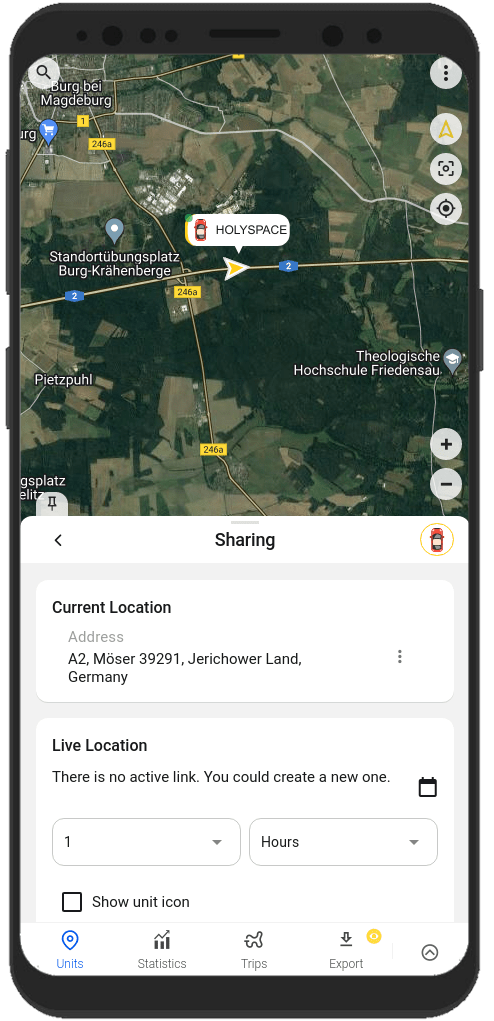
Partager l'emplacement de votre unité avec d'autres personnes
Voulez-vous partager la position de votre véhicule avec vos proches?
Rien de plus facile.
Dans l'application, vous pouvez générer un lien qui mènera à la position de votre unité. Utilisez simplement la fonction "Partage" dans le menu de l'unité.
Vous pouvez toujours trouver des informations sur la configuration et l'utilisation des fonctionnalités dans notre documentation sur le lien
FAQ
To track your location, you need:
1. Tracker integrated on our platform with a SIM card.
2. GPS monitoring application: Ruhavik, Petovik or Forguard.
More details about getting started.
List of integrated devices.
Please note that this list does not include about 500+ device types from the legacy category.
The full list of integrated devices can be seen in the device type line when creating a unit in the application.
Blog articles:
Discover the Power of GPS Tracking with GPS-Trace: Your Ultimate Guide
In order to see your tracker on the map in our application, you need to:
1. Create an account and log into it.
2. Create a unit.
3. Set up a tracker:
- direct your device to the server and port specified on the Hardware tab in the Unit settings;
- set time zone UTC 0;
- configure the APN (depending on the provider of the SIM cards, this may be just the APN or also the APN username and password).
As soon as the tracker starts sending data to our system, you will see your unit on the map.
More details about registration.
Most trackers are configured using SMS commands that are sent to the SIM card used in the tracker.
The list of SMS commands can be found in the instructions for the tracker. Some devices are configured using special programs - configurators - via a PC.
Instructions for the most popular trackers.
The tracking of one unit (car, motorcycle, bicycle, pet, etc.) is free.
With a paid subscription, up to 30 units can be created in one account.
Solution options:
1. Try to remember if your tracker is used in an account created with another email. To restore access to another account, if you remember this email, you can use the ""Forgot password?""
You can also write to us at support@gps-trace.com, specifying the ID/IMEI and type (model) of the tracker, and we will be able to check if the tracker is used in another account.
2. If the tracker is already registered in another account, and you cannot restore access to it, write to us at support@gps-trace.com with the ID / IMEI, type (model) of the tracker and attach a photo of the tracker, we will describe the next steps to solve the problem.
1. To select the most suitable tracker, you can contact one of our partners. You can find a partner on the partner map.
2. Our website has a list of devices integrated into our platform. To select a suitable tracker, you can use the appropriate hashtags: #vehicle #mobile #common #pet. And also see which trackers are the most popular on our platform in general or in your region.
List of integrated devices.
Please note that this list does not include about 500+ device types from the legacy category.
The full list of integrated devices can be seen in the device type line when creating a unit in the application.
Many trackers have different names but work on the same protocols. Accordingly, when connecting a device that is not in the list of integrated ones, you can try to select another type of device from the integrated ones. In this case, we recommend focusing on the protocol used by the tracker as well as SMS commands that your tracker understands and responds to.
If you are unable to select the type of device yourself, please contact us at support@gps-trace.com and write us your login/email, type, model, tracker manufacturer, and attach a photo of the tracker, instructions for it and a screenshot of the device configuration (SMS commands and device's answers), we will try to help you.
Blog articles:
Connecting Clones and Non-Integrated GPS Devices: Practical Tips
You can turn a mobile phone into a tracker using specialized applications.
We suggest using WiaTag or Traccar Client applications for this purpose.
Blog articles:
1. Using a Mobile Phone for Personal Monitoring with Ruhavik
2. How to use your phone as a tracker. Ruhavik & Traccar Client
3. How to use your phone as a tracker. Ruhavik & WiaTag
The tracker may not work for a variety of reasons.
Most frequent:
1) The problem is on the side of the mobile operator (SIM card).
2) Lack of balance on the SIM card.
3) Traffic limit.
4) The device is in a shielded room and therefore there is no communication.
5) Incorrect or lost tracker settings (for example, the tracker has gone into sleep mode or is configured to send messages infrequently).
6) The tracker does not have enough charge and it stores data in a black box until it is connected to a power source.
In this situation, we recommend:
1. Check the traffic limit and the balance of the SIM card used in the tracker. It happens that there is money on the SIM card, for example, but the entire traffic limit has already been used up.
2. Check your tracker settings and message frequency. Sometimes the tracker goes into sleep mode and, accordingly, does not send data about the tracker's location.
3. Check the correct installation of the tracker. Perhaps it is installed in a place (in a shielded box) that does not allow it to see the satellites well.
4. Make sure that the tracker is not located in a shielded area (covered parking, tunnel, building, etc.), which also makes it difficult for the tracker to receive coordinates from the satellite.
Blog articles:
Why GPS trackers may not work
The application has a Sharing option, which is designed to share the location of your unit with others using a special link.
Using the Sharing option, you can create such links for each unit for up to 1 year. It is also possible to create a link to access multiple units.
More details about Sharing.
Blog articles:
1. Use the Sharing option and stay in touch!
2. Updates in Ruhavik: Engine Hour Counters, Multiple Unit Sharing, and Track Tail
3. Petovik's Update: Introducing Sharing Option
To recover your password, you need to do the following:
1. When you enter the application, use the ""Forgot password?"" function, after which an email with a link to reset your password will be sent to the email associated with your account.
2. Follow the link in the email and create a new password.
3. Return to the login page and enter your username and new password.
To change your email address, you can do the following:
1. Go to the user settings by clicking on the three vertical dots in the upper right corner.
2. In the email line, click the pencil icon, a window for changing the address will open.
3. Enter your new email address and current password.
4. In the email that will be sent to your new email address, click on the link to confirm the change of email address.
There are two ways to change your password:
1) Function "Forgot password?"
1. On the account login page, click "Forgot password?", after which an email with a link to reset your password will be sent to the email associated with your account.
2. Follow the link in the email and create a new password.
3. Return to the login page and enter your username and new password.
2) Changing the password in the user settings:
1. Go to the user settings by clicking on the three vertical dots in the upper right corner.
2. In the password bar, click the pencil icon; a window for changing the password will open.
3. Enter the current password as well as the new password and repeat it.
More details about user settings.
In case you do not have access to your account and the email address to which the account is registered, write to us at support@gps-trace.com with the IMEI / ID, type (model) and manufacturer of your tracker, and we will describe the necessary steps to solve the problem.
In case your tracker was offline for some reason, it could accumulate GPS data in memory and, after reconnecting, start uploading this data into our system.
Thus, the time difference is formed:
1. time when the tracker received data from satellites;
2. the time when the data was sent to the system by the tracker.
Thus, so-called messages from the past come into the system.
In the Toolbox, such messages are grayed out.
More details about Toolbox.
The storage is designed to store data that comes from the tracker into our system.
After the entire amount of storage provided by your tariff plan is completely filled, new data from the tracker will overwrite the oldest ones. The application itself will continue to work as usual and will display the current location of the tracker.
The maximum storage period for data transmitted from the tracker in the application is 365 days.
In the statistics tab, the following information is available to users:
- summary mileage information;
- charts by parameters sent by the tracker;
- summary engine hours information (if the tracker sends the engine.ignition.status parameter and the user has a premium subscription);
- export events.
Also, the application collects data on the timeline (all information about the events of the unit: trips, parking, speeding, alarm messages, battery charge, towing, etc.) and on the history of trips (information about the track for a certain day or period of time).
More details about statistics.
Blog articles:
1. Mileage and Engine Hours Counters in Ruhavik
2. Exporting Data from Ruhavik: Detailed Guide
The application allows you to export data for the following sections:
- Timeline (all information about the events of the unit: trips, parking, speeding, alarm messages, battery charge, towing, etc.).
- Trip history (track information for a specific day or period of time).
- Toolbox (all tracker messages sent to our system).
- Export geofences.
For users with a premium subscription, the function of exporting events (in the ".xlsx" format) is available, in which you can choose:
- Required time interval: 1, 7 or 30 days.
- Events to include in statistics.
- Units for which statistics are needed.
- Separate statistics for each unit on a separate page or place them together with the Split into pages function.
- Add summary information for all selected units.
- Download the file to a computer / phone or send it by e-mail.
More details about statistics.
More details about exporting events.
Blog articles:
1. Exporting Data from Ruhavik: Detailed Guide
2. Ruhavik Updates: Nautical Measure, Data Export, and Unit Grouping on the Map
The application offers Simple, Customizable and Own notifications.
The simple ones are notifications:
- by geofences;
- by alarm messages from your device;
- on trips;
- for towing.
The customizable ones are notifications:
- about exceeding the specified speed by the unit;
- about the battery charge;
- the need to charge the device;
- about the absence of messages from the device.
Own notifications (available with a premium subscription).
This type of notification allows you to receive notifications related to the parameters you choose, which are contained in the messages sent by the tracker.
You can receive notifications about fuel, battery, door open/close, alarm activation, and much more.
More details about notification types.
Blog articles:
Notifications: Track your vehicle with ease
Notifications can be sent in the following ways:
- in the form of push notifications;
If you have a paid subscription, the following methods are also available:
- by email to the email associated with your account;
- to the Telegram messenger;
- in the form of webhooks to your server.
More details about setting up notifications in Telegram.
Our application is free to track 1 unit.
The free package also includes the use of 2 geofences and 10 MB of storage.
Benefits of paid subscriptions:
- More units (up to 30);
- More megabytes of data storage (100 MB);
- Google Maps;
- Additional ways to receive notifications that allow you to save them (email, Telegram and web hooks);
- Geofences-polygons;
- Commands Panel - extended custom GPRS commands;
- Export of summary reports in ".xslx"" format;
- Engine hours counters;
and much more.
You can subscribe through Google Play, App Store, or by paying with PayPal or Stripe. The cost of a subscription can be seen in the Subscriptions tab of the application or by clicking on the Subscribe button in the upper left corner on our website.
We really appreciate the feedback and ratings of our users because they help us develop and grow.
If you have the opportunity and a couple of minutes of time, we will be very grateful if you can rate our application:
- on Google Play;
- on App Store.
We communicate with our users via email.
- If you have any questions about working with Ruhavik, Petovik or Forguard applications, please contact us at support@gps-trace.com.
You can also post your question on our forum.
- If you want to become a partner and use our tools to build a monitoring business, write to us at business@gurtam.space.
More details our business solutions.