

Kies uw pad
Bedrijf
Persoonlijk
Stapsgewijze handleiding voor GPS-tracking
Wilt u de locatie van uw voertuig of huisdier volgen, maar weet u niet hoe u moet beginnen? Deze gids leidt je door de basisstappen en laat je zien dat het helemaal niet moeilijk is. Dus laten we beginnen.
Kies en koop de juiste tracker
Op de apparaten pagina, kunt u de apparaten zien die op het platform worden ondersteund en degene kiezen die het beste bij u past.
Op de dealerkaartpagina kunt u de dealers zien van wie u de tracker kunt kopen en die u kunnen helpen bij het gebruik van de applicatie.
Als u wilt, kunt u de tracker op een andere voor u handige plek aanschaffen.
Als u al een tracker heeft, sla dan stap 2 over.
Belangrijk om te wetenAls u een tracker hebt die niet op de lijst met ondersteunde apparaten staat, kunt u ons schrijven en misschien kunnen we dit apparaat aansluiten.
Maak een account aan en log in op de app
Selecteer de juiste trackingtoepassing op de pagina solutions. U kunt de gewenste applicatie downloaden of de webversie gebruiken.
Om het GPS-Trace-platform of een van de toepassingen ervan te gebruiken, moet u zich eerst registreren.
Volg hiervoor de link of klik op de knop "Registreren" in de rechterbovenhoek.
U kunt zich ook registreren op de pagina van een van de applicaties, of in de applicatie zelf.
Vul het formulier in en bevestig uw e-mail om de registratie te voltooien. Het proces duurt niet langer dan 5 minuten.
Nu kunt u inloggen op de applicatie met behulp van het e-mailadres en wachtwoord dat u tijdens de registratie hebt opgegeven.
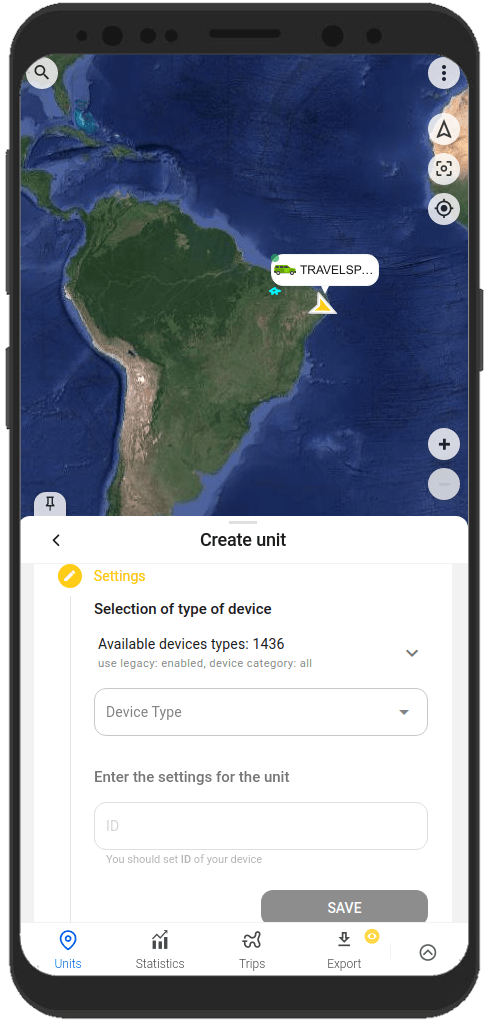
Een eenheid aanmaken
De unit geeft aan wat u wilt volgen, bijvoorbeeld een voertuig of een huisdier.
Het zal niet lang duren om het te maken.
Om een eenheid te maken, klikt u op het veld voor het selecteren van eenheden en selecteert u "Eenheid maken".
Er wordt een stapsgewijs formulier voor het maken van een eenheid geopend:
- Selecteer het model van uw GPS-apparaat (tracker) in de lijst.
- Geef de gegevens van uw tracker op, zoals de ID (IMEI) en, indien nodig, een wachtwoord.
- Klik op de knop "Opslaan".
Belangrijk om te wetenDe eenheid wordt standaard gemaakt met enkele kenmerken, zoals een naam. U kunt ze later wijzigen in de toestelinstellingen.
Configureer de tracker
Nadat u het apparaat hebt aangemaakt, moet u het aansluiten op uw tracker. Zo kan de tracker gegevens naar de applicatie sturen.
Configureer hiervoor de tracker door de volgende acties uit te voeren:
- Configureer de server en poort voor gegevensoverdracht
Wanneer het toestel wordt aangemaakt, toont de toepassing het serveradres (IP of DNS) en de poort waarnaar u uw tracker moet leiden, zodat het systeem gegevens begint te ontvangen, te verwerken en weer te geven in de toepassing. - Stel de UTC 0-tijdzone
in Voor de meeste trackers, ongeacht uw locatie, stelt u precies de UTC 0-tijdzone in. In de toepassing wordt uw lokale tijdzone bepaald aan de hand van de gegevens van het apparaat (telefoon of computer) waarop u het gebruikt. - Configureer de APN
Configureer de APN volgens de provider van de SIM-kaart die u met de tracker gebruikt. Afhankelijk van de provider kan dit alleen de APN zijn of ook de APN gebruikersnaam en wachtwoord.
Zodra u de benodigde instellingen aanpast en uw tracker gegevens naar het geconfigureerde serveradres en de poort begint te verzenden, ziet u deze onmiddellijk op de kaart in de applicatie.

Belangrijk om te wetenTrackers voor gegevensoverdracht moeten worden gebruikt met een simkaart of een chip.
Meestal wordt de handleiding voor het configureren van de tracker bij het apparaat geleverd. U kunt het ook aanvragen bij de verkoper of de fabrikant van uw GPS-tracker.
De tracker wordt meestal geconfigureerd met behulp van SMS-opdrachten aangegeven in de tracker handleiding. De opdrachten worden verzonden naar het nummer van de SIM-kaart die met de tracker wordt gebruikt. Opdrachten worden verzonden naar het nummer van de SIM-kaart die met de tracker wordt gebruikt.
Sommige trackers hebben mogelijk een speciaal programma voor het instellen via een computer.
Handige app-functies
Onze applicaties helpen u niet alleen de locatie van een eenheid op de kaart te volgen, maar behagen u ook met andere functies. Ze zullen u helpen het meeste uit uw tracker te halen.
Hier zijn enkele van deze mogelijkheden:
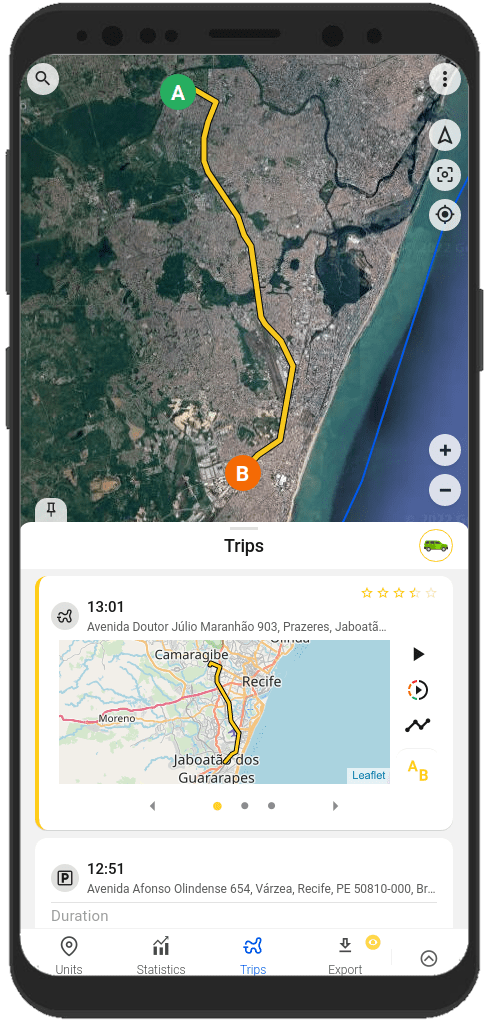
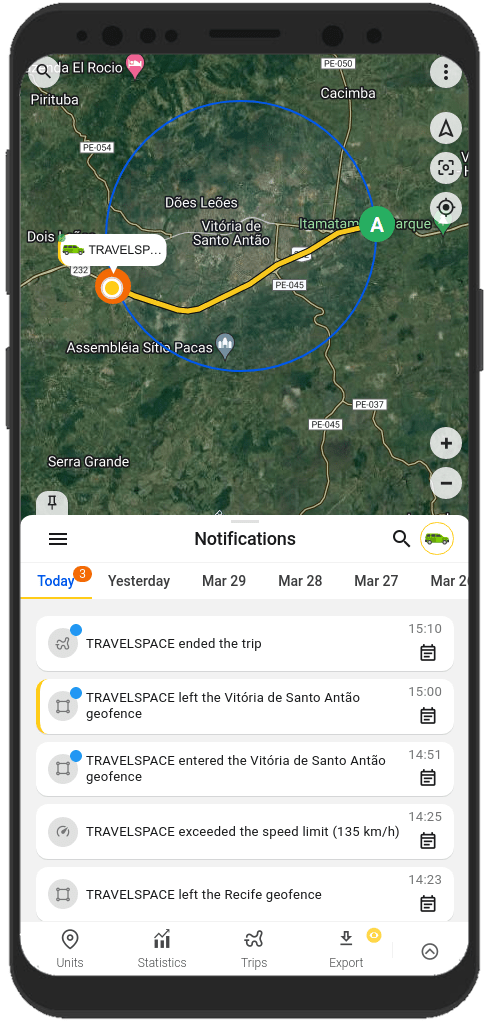
Het bouwen van de tracks en het bekijken van de gebeurtenissen van uw eenheid
Wilt u weten waar uw unit een paar uur of dagen geleden precies stond? Het kost slechts een paar klikken om dit te achterhalen.
Met behulp van de applicatie kunt u een gedetailleerde geschiedenis van bewegingen bekijken, de gebeurtenissen volgen die de afgelopen periode met het apparaat zijn gebeurd.
U kunt dergelijke informatie bekijken op de tabbladen "Trips" en "tijdlijn" en op het tabblad "Geschiedenis" van het eenheidsmenu.
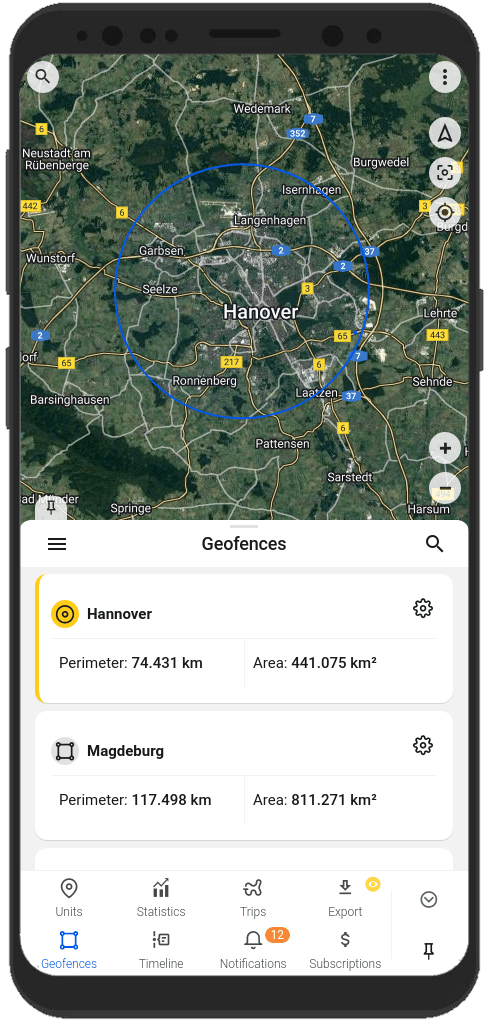
Geofences maken
Een geofence is een gebied dat op de kaart is aangegeven.
In de regel worden geofences gebruikt om meldingen te maken dat een eenheid zich in een bepaald gebied bevindt of deze heeft verlaten. Geofences helpen u ook om sneller door de kaart te navigeren.
U kunt geofences maken en bewerken op het tabblad "Geofences" in de app.
Meldingen ontvangen over de eenheidsstatus en gebeurtenissen met betrekking tot de eenheid
Wilt u altijd in contact staan met uw unit?
De applicatie helpt je hierbij. Ontvang meldingen op de manier die het beste bij u past: in-app meldingen, pushmeldingen, Telegram- en e-mailmeldingen, webhookmeldingen.
U weet altijd:
- over de eenheid die de geofence binnen komt of verlaat;
- over de eenheid die de opgegeven snelheid overschrijdt;
- over het begin en einde van de reis;
U kunt meldingstypen en verzendmethoden configureren op het tabblad "Meldingen", in de instellingen voor eenheidsmeldingen of in het gebruikersmenu.
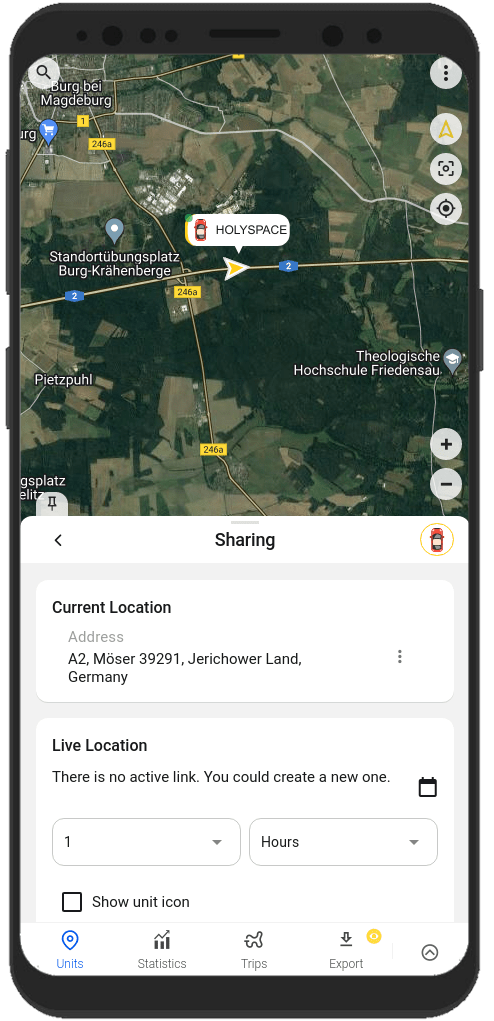
De locatie van uw eenheid delen met andere mensen
Wilt u de locatie van het voertuig delen met uw collega's?
Er is niets eenvoudiger.
In de applicatie kunt u een link genereren die leidt naar de locatie van uw eenheid. Gebruik gewoon de "Delen" functie vanuit het eenheidsmenu.
Informatie over het instellen en werken met de functies vindt u altijd in onze documentatie op de link
FAQ
To track location, you need:
- A tracker integrated on our platform with a SIM card.
- One of the GPS-Trace solutions: Ruhavik, Petovik, or Forguard.
You can either:
- Use the solution independently by purchasing and setting up the tracker yourself,
or - Contact a dealer for a complete solution, which includes the tracker, setup and installation, SIM card, and other related services.
You can find a dealer near you using the Dealer Map.
More details about getting started.
List of integrated devices.
Please note that this list does not include about 500+ device types from the legacy category.
The full list of integrated devices can be seen in the device type line when creating a unit in the application.
Blog articles:
Discover the Power of GPS Tracking with GPS-Trace: Your Ultimate Guide
In order to see your tracker on the map, you need to:
1. Create an account and log into it.
2. Create a unit.
3. Set up a tracker:
- direct your device to the server and port specified on the Hardware tab in the Unit settings;
- set time zone UTC 0;
- configure the APN (depending on the provider of the SIM cards, this may be just the APN or also the APN username and password).
As soon as the tracker starts sending data to our system, you will see your unit on the map.
More details about registration.
Most trackers are configured using SMS commands that are sent to the SIM card used in the tracker.
The list of SMS commands can be found in the instructions for the tracker. Some devices are configured using special programs - configurators - via a PC.
Instructions for the most popular trackers.
The tracking of one unit (car, motorcycle, bicycle, pet, etc.) is free.
With a paid subscription, up to 30 units can be created in one account.
What you can do:
1. Try to remember if your tracker is used in an account created with another email. To restore access to another account, if you remember this email, you can use the "Forgot password?"
You can also write to us at support@gps-trace.com, specifying the ID/IMEI and type (model) of the tracker, and we will be able to check if the tracker is used in another account.
2. If the tracker is already registered in another account, and you cannot restore access to it, write to us at support@gps-trace.com with the ID / IMEI, type (model) of the tracker and attach a photo of the tracker, we will describe the next steps to solve the problem.
1. To select the most suitable tracker, you can contact one of our dealers. You can find a dealer on the Dealer map.
2. Our website has a list of devices integrated into our platform. To select a suitable tracker, you can use the appropriate hashtags: #vehicle #mobile #common #pet. And also see which trackers are the most popular on our platform in general or in your region.
List of integrated devices.
Please note that this list does not include about 500+ device types from the legacy category.
The full list of integrated devices can be seen in the device type line when creating a unit in the application.
Many trackers have different names but work on the same protocols. Accordingly, when connecting a device that is not in the list of integrated ones, you can try to select another type of device from the integrated ones. In this case, we recommend focusing on the protocol used by the tracker as well as SMS commands that your tracker understands and responds to.
If you are unable to select the type of device yourself, please contact us at support@gps-trace.com and write us your login/email, type, model, tracker manufacturer, and attach a photo of the tracker, instructions for it and a screenshot of the device configuration (SMS commands and device's answers), we will try to help you.
Blog articles:
Connecting Clones and Non-Integrated GPS Devices: Practical Tips
You can turn a mobile phone into a tracker using specialized applications.
We suggest using WiaTag or Traccar Client applications for this purpose.
Blog articles:
1. Using a Mobile Phone for Tracking with Ruhavik
2. How to use your phone as a tracker. Ruhavik & Traccar Client
3. How to use your phone as a tracker. Ruhavik & WiaTag
The tracker may not work for a variety of reasons.
Most frequent:
1) The problem is on the side of the mobile operator (SIM card).
2) Lack of balance or traffic limit on the SIM card.
3) The device is in a shielded room and therefore there is no communication.
4) Incorrect or lost tracker settings (for example, the tracker has gone into sleep mode or is configured to send messages infrequently).
5) The tracker does not have enough charge and it stores data in a black box until it is connected to a power source.
In this situation, we recommend:
1. Check the traffic limit and the balance of the SIM card used in the tracker. It happens that there is money on the SIM card, for example, but the entire traffic limit has already been used up.
2. Check your tracker settings and message frequency. Sometimes the tracker goes into sleep mode and, accordingly, does not send data about the tracker's location.
3. Check the correct installation of the tracker. Perhaps it is installed in a place (in a shielded box) that does not allow it to see the satellites well.
4. Make sure that the tracker is not located in a shielded area (covered parking, tunnel, building, etc.), which also makes it difficult for the tracker to receive coordinates from the satellite.
Blog articles:
Why GPS trackers may not work
The application has a Sharing option, which is designed to share the location of your unit with others using a special link.
Using the Sharing option, you can create such links for each unit for up to 1 year. It is also possible to create a link to access multiple units.
Sharing option is only available with a paid subscription.
More details about Sharing.
Blog articles:
1. Use the Sharing option and stay in touch!
2. Updates in Ruhavik: Engine Hour Counters, Multiple Unit Sharing, and Track Tail
3. Petovik's Update: Introducing Sharing Option
To recover your password, you need to do the following:
1. When you enter the application, use the ""Forgot password?"" function, after which an email with a link to reset your password will be sent to the email associated with your account.
2. Follow the link in the email and create a new password.
3. Return to the login page and enter your username and new password.
To change your email address, you can do the following:
1. Go to the user settings by clicking on the three vertical dots in the upper right corner.
2. In the email line, click the pencil icon, a window for changing the address will open.
3. Enter your new email address and current password.
4. In the email that will be sent to your new email address, click on the link to confirm the change of email address.
There are two ways to change your password:
1) Function "Forgot password?"
1. On the account login page, click "Forgot password?", after which an email with a link to reset your password will be sent to the email associated with your account.
2. Follow the link in the email and create a new password.
3. Return to the login page and enter your username and new password.
2) Changing the password in the user settings:
1. Go to the user settings by clicking on the three vertical dots in the upper right corner.
2. In the password bar, click the pencil icon; a window for changing the password will open.
3. Enter the current password as well as the new password and repeat it.
More details about user settings.
In case you do not have access to your account and the email address to which the account is registered, write to us at support@gps-trace.com with the IMEI / ID, type (model) and manufacturer of your tracker, and we will describe the necessary steps to solve the problem.
In case your tracker was offline for some reason, it could accumulate GPS data in memory and, after reconnecting, start uploading this data into our system.
Thus, the time difference is formed:
1. time when the tracker received data from satellites;
2. the time when the data was sent to the system by the tracker.
Thus, so-called messages from the past come into the system.
In the Toolbox, such messages are grayed out. Toolbox is only available with a paid subscription.
More details about Toolbox.
The storage is designed to store data that comes from the tracker into our system.
After the entire amount of storage provided by your tariff plan is completely filled, new data from the tracker will overwrite the oldest ones. The application itself will continue to work as usual and will display the current location of the tracker.
The maximum storage period for data transmitted from the tracker is 365 days.
In the Statistics tab, the following information is available to users:
- summary mileage information;
- charts by parameters sent by the tracker;
- summary engine hours information (if the tracker sends the engine.ignition.status parameter and the user has a premium subscription);
- export events.
Statistics tab is only available with a paid subscription.
More details about statistics.
Also, the application collects data on the timeline (all information about the events of the unit: trips, parking, speeding, alarm messages, battery charge, towing, etc.) and on the history of trips (information about the track for a certain day or period of time).
Timeline tab is only available with a paid subscription.
Blog articles:
1. Mileage and Engine Hours Counters in Ruhavik
2. Exporting Data from Ruhavik: Detailed Guide
You can export data for the following sections:
- Timeline
(all information about the events of the unit: trips, parking, speeding, alarm messages, battery charge, towing, etc.).
- History
- Export events
- Toolbox
- Export geofences.
available with a paid subscription.
Blog articles:
1. Exporting Data from Ruhavik: Detailed Guide
2. Ruhavik Updates: Nautical Measure, Data Export, and Unit Grouping on the Map
The application offers Simple, Customizable and Parameter notifications.
The simple ones are notifications:
- by geofences;
- by alarm messages from your device;
- on trips;
- for towing.
The customizable ones are notifications:
- about exceeding the specified speed by the unit;
- about the battery charge;
- the need to charge the device;
- about the absence of messages from the device.
Parameter notifications allows you to receive notifications related to the parameters you choose, which are contained in the messages sent by the tracker.
You can receive notifications about fuel, battery, door open/close, alarm activation, and much more.
available with a paid subscription.
More details about notification types.
Blog articles:
Notifications: Track your vehicle with ease
Notifications can be sent in the following ways:
- in the form of push notifications;
If you have a paid subscription, the following methods are also available:
- by email to the email associated with your account;
- to the Telegram messenger;
- in the form of webhooks to your server.
More details about setting up notifications in Telegram.
Our application is free to track 1 unit.
The free package also includes the use of 1 geofence and 1 MB of storage.
With a paid subscription, users can get additional benefits, the volume and level of which depend on the chosen subscription plan:
- Up to 30 units per account
- More data storage (up to 100 MB)
- Google Maps
- Advanced notifications and additional delivery methods (email, Telegram, and webhooks)
- Up to 15 geofences of various shapes, including polygons
- Unit Tools: Toolbox and SetBox – allow you to remotely configure the operation of GPS devices, view messages from the tracker, connection logs, errors, unit edits, and all raw traffic.
- Commands Panel – GPRS commands for greater control over your devices (available from the Premium Basic plan and higher).
- Location Sharing – the ability to share the location of your vehicles with other people using a special link.
- Timeline – track all unit events for the selected day in chronological order.
- Statistics – view unit statistics, analyze data with charts, and export summary reports in various formats.
- Maintenance – monitor the condition of your vehicle and manage its maintenance using mileage and engine hours counters.
- And more.
You can subscribe via Google Play, App Store, or by paying via PayPal or Stripe directly on the website.
The subscription cost can be viewed in the Subscriptions section of the application or by clicking the Subscribe button in the upper left corner of our website.
More details on our pricing.
We really appreciate the feedback and ratings of our users because they help us develop and grow.
If you have the opportunity and a couple of minutes of time, we will be very grateful if you can rate our application:
- on Google Play;
- on App Store.
We communicate with our users via email.
- If you have any questions about working with Ruhavik, Petovik or Forguard solutions, please contact us at support@gps-trace.com.
You can also post your question on our forum.
- If you want to become a partner and use our tools to build a monitoring business, write to us at business@gurtam.space.
More details our business solutions.