Getting Started with GPS-Trace Platform
This guide will walk you through the steps to start using our platform.
So let's get started!
Register in GPS-Trace Console
GPS-Trace Console is your central management hub for creating and managing accounts across all GPS-Trace solutions.
Registration is simple:
- Visit the registration page.
- Click on the Sign up button.
- Fill in the required fields.
- Confirm your email.
That's it! You now have access to the platform.
What GPS-Trace Console gives you:
- Create accounts and units in any solution on the GPS-Trace platform.
- Configure plans, thereby managing the application functionality.
- Customize branding with your logo and colors.
- Get help from the built-in 24/7 AI assistant and the documentation.
- Use Platform API for advanced integrations.
- Payment collection tools (Stripe/PayPal).
- Remote technical support capabilities.
- Autoblocking of users for non-payment.
- Service provider map listing and company profile display in the client’s solution.
Activate 30-Day Trial
After registration, activate your Trial period directly in the platform console to explore the full functionality of the platform at no cost.
What you can test during Trial:
- 2 accounts with access to Forguard application (up to 30 units in each)
- 2 accounts with access to Tags solution (up to 10 sensors in each)
- Configuring plans with different features and limits
- Core features unlocked - multi-user access, custom branding etc.
Create Plan
GPS-Trace Platform connects you to two tracking solutions: Forguard and Tags.
Before creating an account with access to Forguard or Tags, you need to set up a Client Plan - a configuration that defines which features will be available and what limits will apply.
Client Plans are built on the plans provided by GPS-Trace. You can view the available plans and their pricing here.
Creating Your First Plan
- Navigate to the Forguard or Tags section in GPS-Trace Console
- Go to the Client Plans tab
- Click the "+" button to create a new plan
- Set maximum limits (units, geofences, history period)
- Select features to enable
- Save your plan
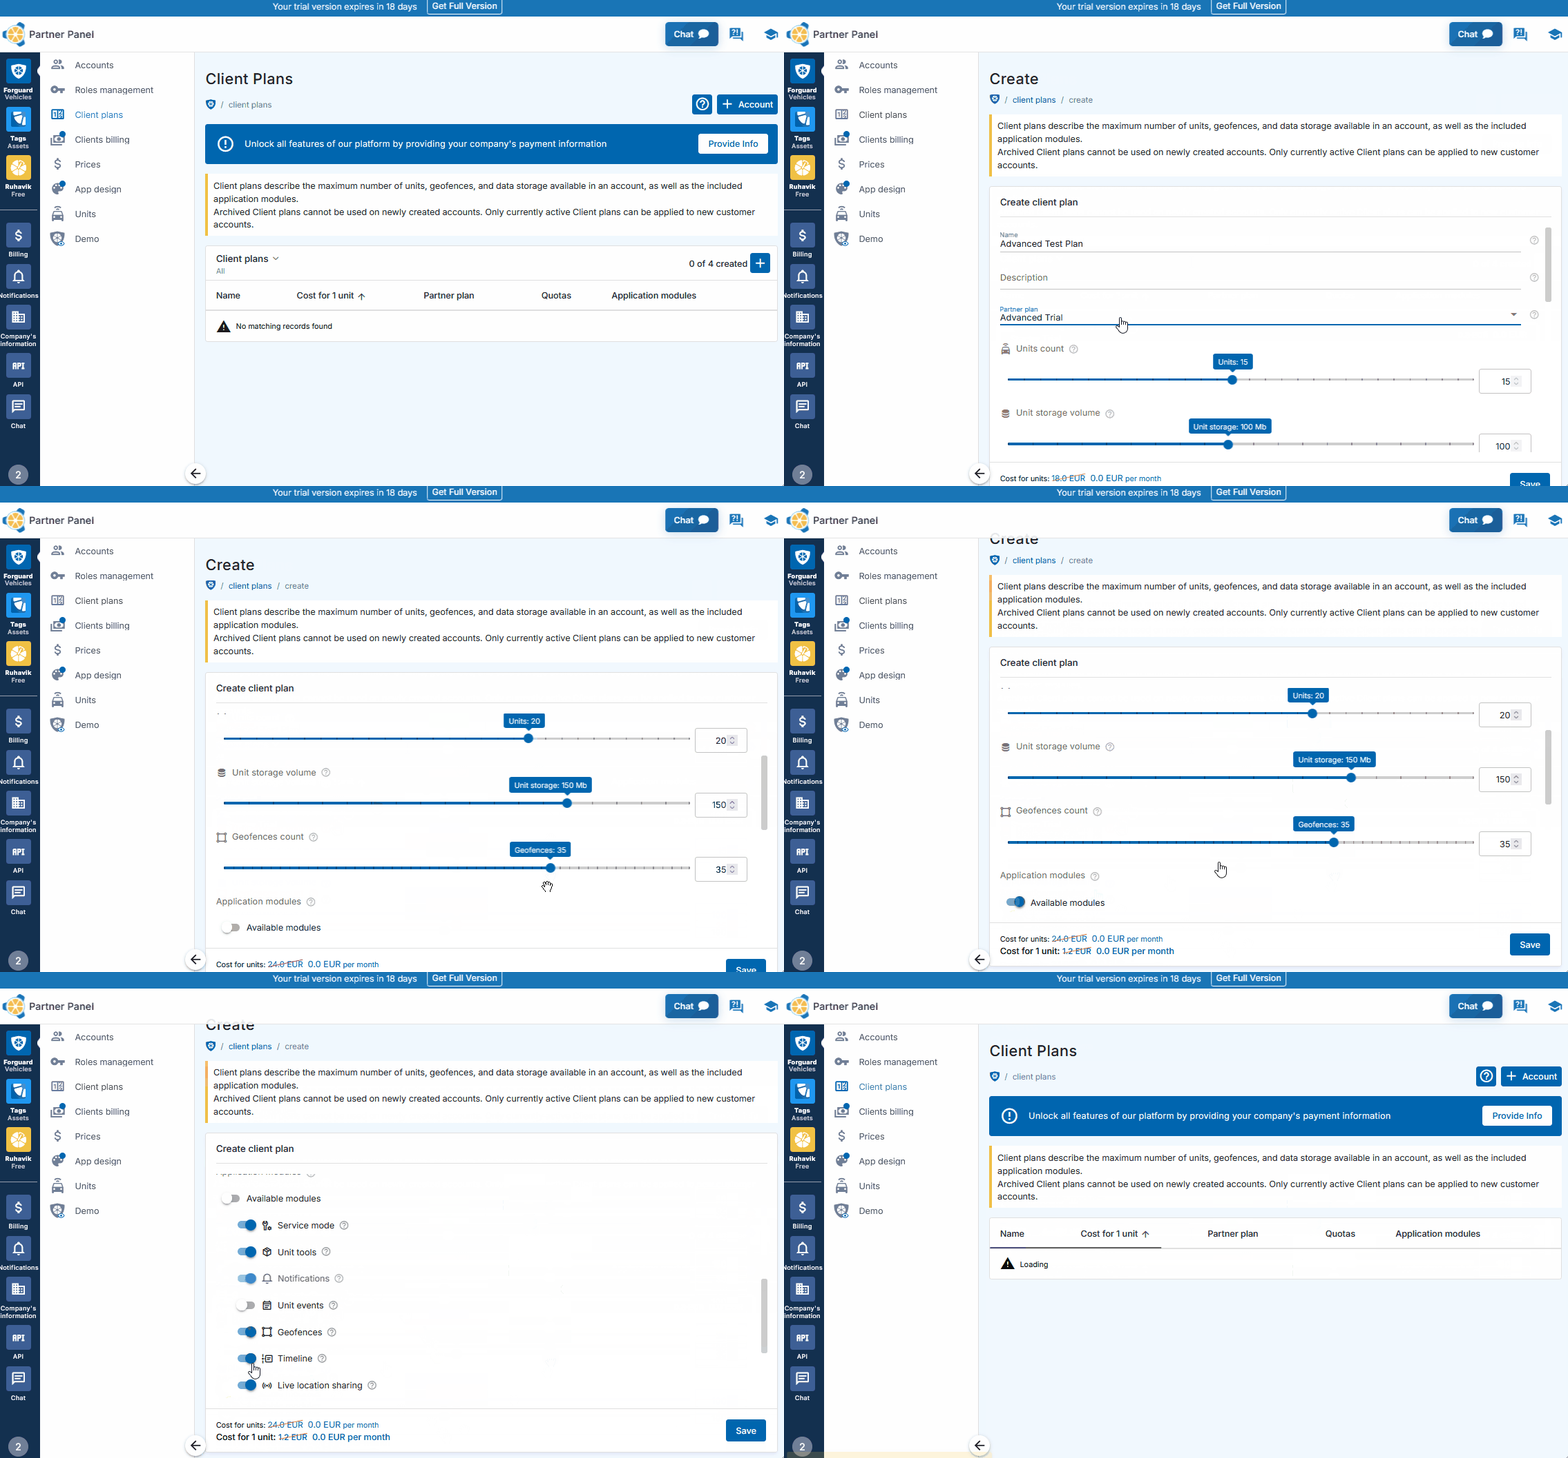
Client Plans allow service providers to create different service packages with varying features and price points. Service providers can offer tiered options (Basic, Professional, Enterprise and so on) to different customer segments and set their own pricing.
The profit margin is the difference between what service providers charge their clients and what they pay to GPS-Trace.
Create Account
Now that you have a Client Plan ready, it's time to create an account that will provide access to the application (Forguard or Tags).
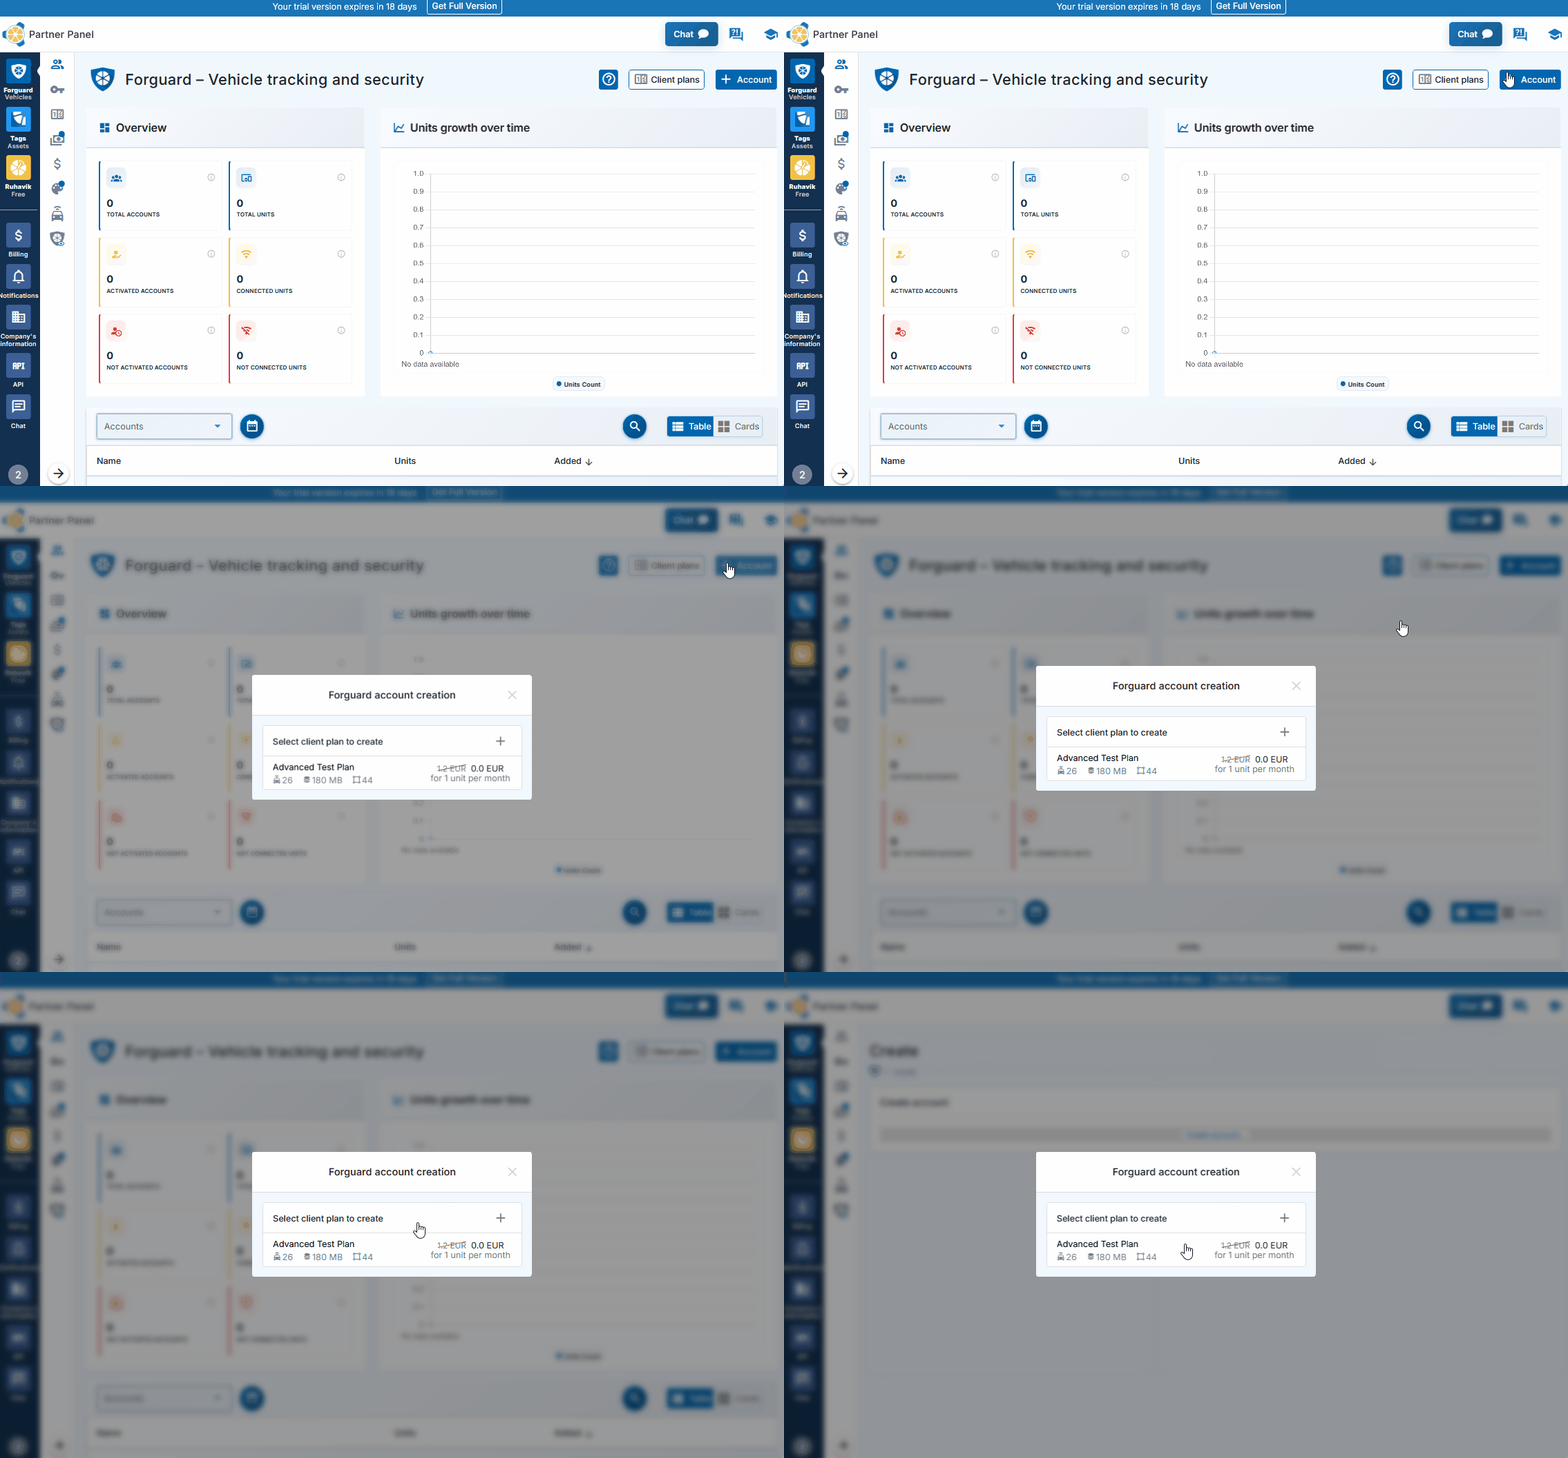
Creating an Account
- Go to the Forguard or Tags tab in GPS-Trace Console
- Click the blue "+" button in the Accounts section
- Select the previously created Client Plan from the dropdown menu.
- Click on the 'Save' button.
Done! The account is created instantly.
To start using the application, activate the account by setting login credentials via the activation link or QR code. This can be done by yourself (if using for your own business) or shared with a client for their activation.
The platform supports multi-user access to applications with permission management. Additional users can be created directly in GPS-Trace Console with customized access levels.
Two tools help organize team access:
Roles - define which features users can access (notifications, reports, geofences, commands) and what actions they can perform (view, create, edit, delete)
Access Lists - control which specific devices (units) each user can see, useful for separating access by teams, regions, or vehicle types.
Create Unit
Units are the physical GPS trackers or gateways that collect and transmit data to the platform. Without units, the account won't have any devices to track. Creating units connects your hardware to the system.
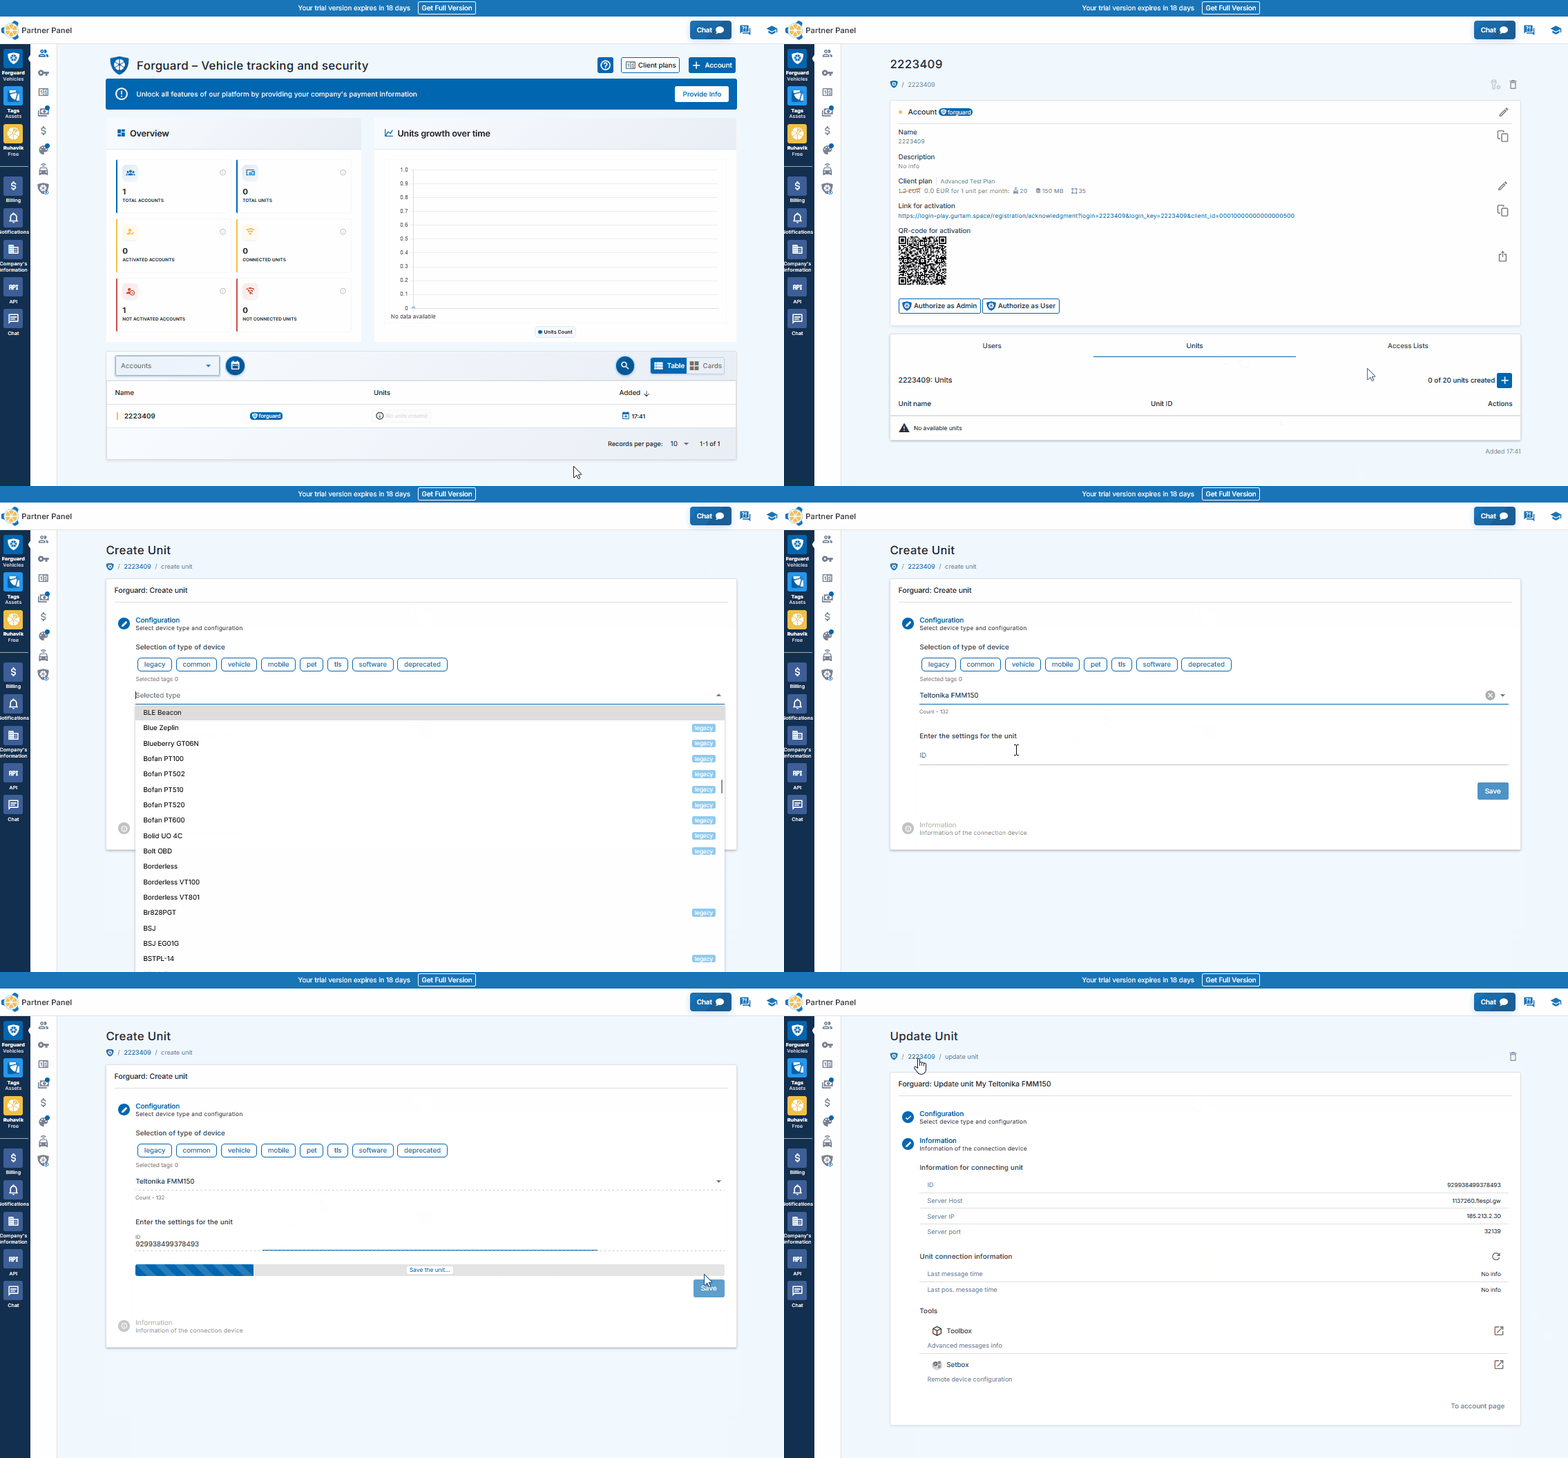
Creating Units in Forguard
- Select the account you want to add a unit to
- Click the "+" icon in the Units section
- Select the model of your GPS device (tracker) from the list.
- Enter device details (IMEI, password if required)
- Click on the 'Save' button
If your device is properly configured and transmitting data, you'll see it online within minutes.
Tags works with 3 types of entities:
- Gateways - GPS trackers that detect BLE sensors and transmit data
- Sensors - Source of data that can be linked to an asset (BLE tags, wired sensors, or parameters from gateways).
- Assets - Physical object that has value for the user and needs to be tracked (container, trailer, a tool, a piece of equipment).
Creating gateways follows the same process as creating Forguard units (steps above).
Creating Sensors in Tags
- Log in to Tags
- Navigate to a Gateway's page to see detected BLE devices
- Click "+" next to unlinked devices to create sensors
- Or create sensors from gateway parameters via the Telemetry data tab
Sign Offer Agreement
When you are ready to continue using the platform beyond the trial period, sign the Offer Agreement.
- Go to Company's Payment Information section
- Fill in the required details and upload verification documents (company registration certificate or business entity registration document)
- Submit for verification
- Once approved, read and accept the Offer Agreement
That's it! You're now a fully authorized user with complete access to the platform.
After signing the Offer Agreement and completing verification, service providers unlock advanced business tools:
- Client billing - PayPal and Stripe integration with payment link generation and automated customer invoicing
- Automatic account blocking - ability to set a blocking date for clients
- Advanced custom branding - own domain (CNAME) and application name
- Draft units - pre-creation of units without billing charges until assignment to client accounts
30-day trial
No payment details required.